Android Development Posts
How to Implement Splash Screen in AndroidAndroid Development

How to Implement Splash Screen in AndroidAndroid Development
What is a SplashScreen?
A splash screen is a screen that appears when you open an app on your mobile device. So, we can say that it is the first impression for the user. It is commonly used to show an application logo or an image associated with an application.
Implementation
So instead of using a layout file, we'll refer to the splash screen as the background of the activity theme. first, create an XML drawable splash_background.xml inside the res/drawable folder in
<?xml version="1.0" encoding="utf-8"?>
<layer-list xmlns:android="http://schemas.android.com/apk/res/android">
<item android:drawable="@color/white" />
<item android:drawable="@drawable/ic_icon_vector" android:gravity="center" />
</layer-list>
next step, set splash_groundground.xml as the background for your splash activity in the theme. Add a new splash to your splash activity.
<!-- Splash Screen theme. -->
<style name="SplashTheme" parent="Theme.AppCompat.NoActionBar">
<item name="android:windowBackground">@drawable/splash_background></item>
</style>
Add your theme to AndroidManifest.xml as your splash activity theme.
<?xml version="1.0" encoding="utf-8"?>
<manifest xmlns:android="http://schemas.android.com/apk/res/android"
package="com.exmple.splash">
<application
android:allowBackup="true"
android:icon="@mipmap/ic_launcher"
android:label="@string/app_name"
android:roundIcon="@mipmap/ic_launcher_round"
android:supportsRtl="true"
android:theme="@style/Theme">
<activity
android:name=".SplashActivity"
android:theme="@style/SplashTheme">
<intent-filter>
<action android:name="android.intent.action.MAIN" />
<category android:name="android.intent.category.LAUNCHER" />
</intent-filter>
</activity>
</application>
</manifest></pre><div>
}
Create a blank activity for SplashActivity.java without XML. This class will only redirect to MainActivity.java.
public class SplashActivity extends AppCompatActivity {
@Override
protected void onCreate(Bundle savedInstanceState) {
super.onCreate(savedInstanceState);
startActivity(new Intent(SplashActivity.this, MainActivity.class));
finish();
}
}
How to Create Custom CardView in AndroidAndroid Development

How to Create Custom CardView in AndroidAndroid Development
Customized CardView
dependencies {
implementation
‘androidx.cardview:cardview:1.0.0’
}
res > drawable > New > Drawable Resource File.
background1.xml
<?xml version="1.0" encoding="utf-8"?>
<shape xmlns:android="http://schemas.android.com/apk/res/android">

background2.xml
<?xml version="1.0" encoding="utf-8"?>
<shape xmlns:android="http://schemas.android.com/apk/res/android">
background3.xml
<?xml version="1.0" encoding="utf-8"?>
<shape xmlns:android="http://schemas.android.com/apk/res/android">

Now create a card view in the main XML file. Here I used LinearLayout as the root widget, after using the card view. Below the codes that give you an idea of how to customize the card.
You can change it according to your needs.
activity_main.xml
<?xml version="1.0" encoding="utf-8"?>
<LinearLayout xmlns:android="http://schemas.android.com/apk/res/android" xmlns:app="http://schemas.android.com/apk/res-auto"
xmlns:tools="http://schemas.android.com/tools"
android:layout_width="match_parent"
android:layout_height="match_parent"
android:orientation="vertical">
<androidx.cardview.widget.CardView
android:layout_width="match_parent"
android:layout_height="173dp"
android:layout_marginStart="20dp"
android:layout_marginTop="20dp"
android:layout_marginEnd="20dp"
app:cardCornerRadius="8dp">
<LinearLayout
android:id="@+id/linearLayout1"
android:layout_width="match_parent"
android:layout_height="match_parent"
android:background="@drawable/bg1"
android:orientation="vertical">
<LinearLayout
android:layout_width="match_parent"
android:layout_height="wrap_content"
android:layout_marginStart="30dp"
android:layout_marginTop="20dp"
android:layout_marginEnd="30dp"
android:orientation="horizontal">
<LinearLayout
android:layout_width="wrap_content"
android:layout_height="wrap_content"
android:orientation="vertical">
<TextView
android:layout_width="wrap_content"
android:layout_height="wrap_content"
android:text="Assam"
android:textColor="#000000"
android:textSize="22sp" />
<TextView
android:layout_width="wrap_content"
android:layout_height="wrap_content"
android:text="Current Location"
android:textColor="#000000"
android:textSize="14sp" />
</LinearLayout>
</LinearLayout>
<LinearLayout
android:layout_width="match_parent"
android:layout_height="match_parent"
android:layout_marginStart="30dp"
android:layout_marginTop="20dp"
android:layout_marginEnd="30dp"
android:orientation="horizontal">
<TextView
android:layout_width="wrap_content"
android:layout_height="wrap_content"
android:text="25"
android:textColor="#000000"
android:textSize="28sp" />
<LinearLayout
android:layout_width="wrap_content"
android:layout_height="wrap_content"
android:orientation="vertical">
<TextView
android:layout_width="wrap_content"
android:layout_height="wrap_content"
android:layout_marginStart="6dp"
android:text="o"
android:textColor="#000000"
android:textSize="13sp" />
</LinearLayout>
<TextView
android:layout_width="wrap_content"
android:layout_height="wrap_content"
android:text="18 %"
android:textColor="#000000"
android:textSize="14sp" />
<RelativeLayout
android:layout_width="match_parent"
android:layout_height="match_parent">
<TextView
android:layout_width="wrap_content"
android:layout_height="wrap_content"
android:layout_alignParentEnd="true"
android:layout_marginStart="6dp"
android:text="11.25 AM"
android:textColor="#000000"
android:textSize="14sp" />
</RelativeLayout>
</LinearLayout>
</LinearLayout>
</androidx.cardview.widget.CardView>
<androidx.cardview.widget.CardView
android:layout_width="match_parent"
android:layout_height="173dp"
android:layout_marginStart="20dp"
android:layout_marginTop="20dp"
android:layout_marginEnd="20dp"
app:cardCornerRadius="8dp">
<LinearLayout
android:layout_width="match_parent"
android:layout_height="match_parent"
android:background="@drawable/bg2"
android:orientation="vertical">
<LinearLayout
android:layout_width="match_parent"
android:layout_height="wrap_content"
android:layout_marginStart="30dp"
android:layout_marginTop="20dp"
android:layout_marginEnd="30dp"
android:orientation="horizontal">
<LinearLayout
android:layout_width="wrap_content"
android:layout_height="wrap_content"
android:orientation="vertical">
<TextView
android:layout_width="wrap_content"
android:layout_height="wrap_content"
android:text="Delhi"
android:textColor="@color/white"
android:textSize="22sp" />
<TextView
android:layout_width="wrap_content"
android:layout_height="wrap_content"
android:text="2 days ago"
android:textColor="@color/white"
android:textSize="14sp" />
</LinearLayout>
</LinearLayout>
<LinearLayout
android:layout_width="match_parent"
android:layout_height="match_parent"
android:layout_marginStart="30dp"
android:layout_marginTop="20dp"
android:layout_marginEnd="30dp"
android:orientation="horizontal">
<TextView
android:layout_width="wrap_content"
android:layout_height="wrap_content"
android:text="39"
android:textColor="@color/white"
android:textSize="28sp" />
<LinearLayout
android:layout_width="wrap_content"
android:layout_height="wrap_content"
android:orientation="vertical">
<TextView
android:layout_width="wrap_content"
android:layout_height="wrap_content"
android:layout_marginStart="6dp"
android:text="o"
android:textColor="@color/white"
android:textSize="13sp" />
</LinearLayout>
<TextView
android:layout_width="wrap_content"
android:layout_height="wrap_content"
android:text="35 %"
android:textColor="@color/white"
android:textSize="14sp" />
<RelativeLayout
android:layout_width="match_parent"
android:layout_height="match_parent">
<TextView
android:layout_width="wrap_content"
android:layout_height="wrap_content"
android:layout_alignParentEnd="true"
android:layout_marginStart="6dp"
android:text="01.05 PM"
android:textColor="#D6D6D6"
android:textSize="14sp" />
</RelativeLayout>
</LinearLayout>
</LinearLayout>
</androidx.cardview.widget.CardView>
<androidx.cardview.widget.CardView
android:layout_width="match_parent"
android:layout_height="173dp"
android:layout_marginStart="20dp"
android:layout_marginTop="20dp"
android:layout_marginEnd="20dp"
app:cardCornerRadius="8dp">
<LinearLayout
android:layout_width="match_parent"
android:layout_height="match_parent"
android:background="@drawable/bg3"
android:orientation="vertical">
<LinearLayout
android:layout_width="match_parent"
android:layout_height="wrap_content"
android:layout_marginStart="30dp"
android:layout_marginTop="20dp"
android:layout_marginEnd="30dp"
android:orientation="horizontal">
<LinearLayout
android:layout_width="wrap_content"
android:layout_height="wrap_content"
android:orientation="vertical">
<TextView
android:layout_width="wrap_content"
android:layout_height="wrap_content"
android:text="Darjeeling"
android:textColor="#000000"
android:textSize="22sp" />
<TextView
android:layout_width="wrap_content"
android:layout_height="wrap_content"
android:text="2 weeks ago"
android:textColor="#000000"
android:textSize="14sp" />
</LinearLayout>
</LinearLayout>
<LinearLayout
android:layout_width="match_parent"
android:layout_height="match_parent"
android:layout_marginStart="30dp"
android:layout_marginTop="20dp"
android:layout_marginEnd="30dp"
android:orientation="horizontal">
<TextView
android:layout_width="wrap_content"
android:layout_height="wrap_content"
android:text="12"
android:textColor="#000000"
android:textSize="28sp" />
<LinearLayout
android:layout_width="wrap_content"
android:layout_height="wrap_content"
android:orientation="vertical">
<TextView
android:layout_width="wrap_content"
android:layout_height="wrap_content"
android:layout_marginStart="6dp"
android:text="o"
android:textColor="#000000"
android:textSize="13sp" />
</LinearLayout>
<TextView
android:layout_width="wrap_content"
android:layout_height="wrap_content"
android:text="9 %"
android:textColor="#000000"
android:textSize="14sp" />
<RelativeLayout
android:layout_width="match_parent"
android:layout_height="match_parent">
<TextView
android:layout_width="wrap_content"
android:layout_height="wrap_content"
android:layout_alignParentEnd="true"
android:layout_marginStart="6dp"
android:text="05.00 AM"
android:textColor="#000000"
android:textSize="14sp" />
</RelativeLayout>
</LinearLayout>
</LinearLayout>
</androidx.cardview.widget.CardView>
</LinearLayout>

How to create different type shape in android javaAndroid Development

How to create different type shape in android javaAndroid Development
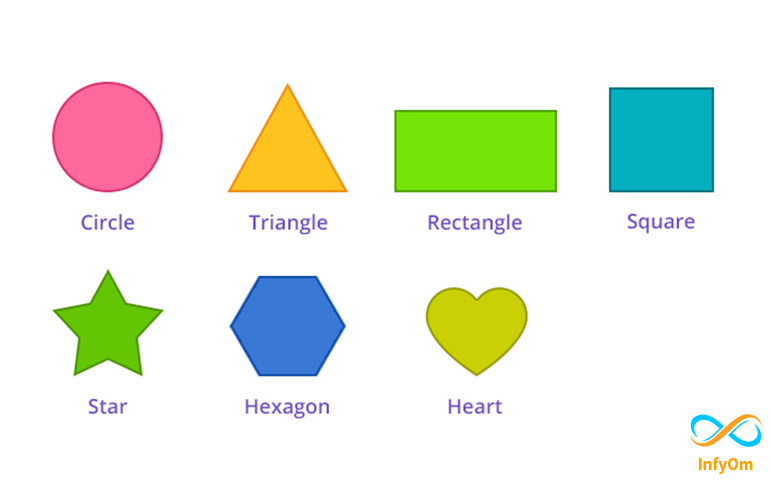
Hello, wonderful friends today in this blog on learning in android XML files creating different types of shape creating. A shape is an XML file that defines a geometric shape, including strokes, colors, and gradients
First Creating .xml file:
- Open android studio
- Go to drawable
- Right-click drawable menu
Follow below image steps:
Now friend starts coding:
- Creating a capsule shape flow below code:
<?xml version="1.0" encoding="utf-8"?>
<shape xmlns:android="http://schemas.android.com/apk/res/android" android:shape="rectangle" >
<corners
android:bottomLeftRadius="30dp"
android:bottomRightRadius="30dp"
android:radius="60dp"
android:topLeftRadius="30dp"
android:topRightRadius="30dp"/>
Corners:
The below image is showing the shape corner radius
Solid:
Solid means shape inner color “#CFCFCF”
Padding:
There is always developer confusion between padding and margin. Both provide extra space/gap inside or outside the container. In simple words, margin means to push outside, whereas padding means to push inside.
Size:
It's very simple shape width - height
How To Integrate onesignal push notification in AndroidAndroid Development

How To Integrate onesignal push notification in AndroidAndroid Development
Step: 1 Create a new Project in Android Studio
Add OneSignal dependency and plugin to your build.Gradle app-level.
apply plugin: 'com.onesignal.androidsdk.onesignal-gradle-plugin'
dependencies {
implementation 'com.onesignal:OneSignal:3.12.6'
}
buildscript {
repositories {
google()
jcenter()
}
dependencies {
classpath 'com.android.tools.build:gradle:4.1.0'
classpath 'gradle.plugin.com.onesignal:onesignal-gradle-plugin:[0.12.4, 0.99.99]'
}
}
Step: 2 Create a new OneSignal Project
- login your OneSignal Account than create an app
- Enter Your Android Application Name & Select platform Google Android(FCM)
- Generate a Firebase Server Key Read the documentation.
- Enter your Firebase Server Key & Firebase Sender ID.
Step: 3 Add Your Created Onesignal App ID
android {
compileSdkVersion 30
buildToolsVersion "30.0.2"
defaultConfig {
applicationId "com.myapplication.app"
minSdkVersion 17
targetSdkVersion 30
versionCode 1
versionName "1.0.0"
multiDexEnabled true
testInstrumentationRunner "androidx.test.runner.AndroidJUnitRunner"
manifestPlaceholders = [onesignal_app_id: "Enter Your App ID",]
}
buildTypes {
release {
minifyEnabled true
shrinkResources true
proguardFiles getDefaultProguardFile('proguard-android-optimize.txt'), 'proguard-rules.pro'
}
}
compileOptions {
sourceCompatibility JavaVersion.VERSION_1_8
targetCompatibility JavaVersion.VERSION_1_8
}
}
import android.app.Application;
import android.content.Context;
import androidx.multidex.MultiDex;
import com.onesignal.OneSignal;
public class MyApplication extends Application {
public static Context context;
@Override
public void onCreate() {
super.onCreate();
context = getApplicationContext();
context = this;
OneSignal.startInit(this) .inFocusDisplaying(OneSignal.OSInFocusDisplayOption.Notification)
.unsubscribeWhenNotificationsAreDisabled(true)
.init();
}
public static Context getContext() {
return context;
}
}
<?xml version="1.0" encoding="utf-8"?>
<manifest xmlns:android="http://schemas.android.com/apk/res/android"
package="com.myapplication.app">
<uses-permission android:name="android.permission.INTERNET"/
<uses-permission
android:name="android.permission.ACCESS_NETWORK_STATE" />
<application
android:name="com.myapplication.app.MyApplication"
android:allowBackup="true"
android:icon="@mipmap/ic_launcher"
android:label="@string/app_name"
android:requestLegacyExternalStorage="true"
android:supportsRtl="true"
android:theme="@style/AppTheme">
<activity
android:name="com.myapplication.app.activity.SplashActivity"
android:screenOrientation="portrait">
<intent-filter>
<action android:name="android.intent.action.MAIN" />
<category android:name="android.intent.category.LAUNCHER" />
</intent-filter>
</activity>
</application>
</manifest>
How to create any API response model class in android javaAndroid Development

How to create any API response model class in android javaAndroid Development
- Developer use API calling retrofit, volley JSON or other tools but API response check-in postman time confusion how to creating this response model class
- So a friend in this topic I will try your confusion remove flow below all steps and 5 min inner creating a wonderful model class
Step: 1 Android studio in install "RoboPOJOGenerator"
- Location in the android studio:
- Open android studio
- Go to File
- Go to Setting
- Click plugin
- check the below image && click and install RoboPOJOGenerator then your android studio restart
Step: 2 How to open RoboPOJOGenerator
- Open android studio
- Go to File
- Select directory below the image in showing related select any one directory
- Right-click - select New - then below showing "RoboPOJOGenerator"
Step: 3 How to add postman response
- Postman response copy
- Paste this response in "RoboPOJOGenerator" in one black color dialog showing in android studio
- Left top side one cursor visible on this area in paste this response
- Select "GSON" option in "RoboPOJOGenerator"
- Last click generate button after a few moments your model class is ready
Facebook Login With Firebase In Android JavaAndroid Development

Facebook Login With Firebase In Android JavaAndroid Development
1.Add this library build.gradle(:app)
- This library user for firebase integration dependencies
{
implementation 'com.google.firebase:firebase-auth:19.4.0'
}
2.Add this permission in AndroidManifest.xml
- This permission use internet connection checking
{
<com.facebook.login.widget.LoginButton
android:id="@+id/login_button"
android:layout_width="match_parent"
android:layout_height="match_parent"
android:layout_gravity="center"
android:visibility="gone"/>
}
3.Activity in add this permission
- This permission is for user data. Without this permission user data not meet
- loginButtonThis button is Facebook button
- LoginManager.getInstance().logInWithReadPermissions(FacebookLoginActivity.this, Arrays.asList("email", "public_profile"));
- loginButton.setReadPermissions("email", "public_profile");
4.Initialize Authentication:
void initializeAuthentication(){
FirebaseAuth mAuth = FirebaseAuth.getInstance();
GoogleSignInOptions gso = new GoogleSignInOptions.Builder(GoogleSignInOptions.DEFAULT_SIGN_IN)
.requestIdToken(getString(R.string.default_web_client_id))
.requestEmail()
.build();
mGoogleSignInClient = GoogleSignIn.getClient(this, so);
}
7.Add This Function:
- This function user login result return
void faceBookLogin(LoginResult loginResult){
setFacebookData(loginResult);
Profile profile = Profile.getCurrentProfile();
if (profile != null) {
String avatar = ImageRequest.getProfilePictureUri(profile.getId(), 200, 200)
.toString();
} handleFacebookAccessToken(loginResult.getAccessToken());
}
7.Handle Token :
- This token return firebase login fails or not an event
private void handleFacebookAccessToken(AccessToken token) {
AuthCredential credential = FacebookAuthProvider.getCredential(token.getToken());
mAuth.signInWithCredential(credential)
.addOnCompleteListener(this, new OnCompleteListener() {
@Override
public void onComplete(@NonNull Task task) {
if (task.isSuccessful()) {
FirebaseUser user = mAuth.getCurrentUser();
user.getIdToken(true).addOnCompleteListener(new OnCompleteListener() {
@Override
public void onComplete(@NonNull Task task) {
String token = task.getResult().getToken();
}
});
} else {
String errorCode = String.valueOf(task.getException());
Toast.makeText(FacebookLoginActivity.this, "Login failed.", Toast.LENGTH_SHORT).show();
}
}
});
}
Notes:
- “Default_web_client_id” this keyword, not changes because creating google-services.json file time automatically this keyword in add values so this key work put at its

Send Device-to-Device Push Notification using Firebase Cloud MessagingAndroid Development

Send Device-to-Device Push Notification using Firebase Cloud MessagingAndroid Development
Firebase Cloud Messaging (FCM) is a cross-platform messaging solution that lets you deliver messages for free.
It allows you to send push notifications from the Firebase console or from the application server or some trusted server where logic runs.
Step 1:- Create a new Android Studio Project
First, create a new Android Studio project and add the dependencies. First set up Firebase in your project. You can find a good tutorial.
Add Firebase messaging dependency to your app-level.
build.Gradle
dependencies {
implementation 'com.google.firebase:firebase-messaging:19.0.1'
}
Step 2: Create a Firebase Service
The next step is to create Firebase Services:-
MyFirebaseInstanceIDService
and MyFirebaseMessagingService
. first MyFirebaseInstanceIDService
service will handle the device registration process and the second MyFirebaseInstanceIDService
will handle the reception and display of notifications. The services have no visual interface and are used for operations that run in the background. To create a service, right-click and select the Applications folder New -> Service -> Service.
Type in your service name, and click the Finish button. Repeat the same steps for the second service.
AndroidManifest.xml file and update your service declarations under the application tag. Also, add INTERNET
and CLOUD TO DEVICE MESSAGING
permissions so your app can interact with the FCM server.
<!--?xml version="1.0" encoding="utf-8"?-->
<manifest xmlns:android="http://schemas.android.com/apk/res/android" package="com.exmple.notify">
<uses-permission android:name="android.permission.INTERNET">
<uses-permission android:name="com.google.android.c2dm.permission.RECEIVE">
<application android:allowbackup="true"
android:icon="@mipmap/ic_launcher"
android:label="@string/app_name"
android:roundicon="@mipmap/ic_launcher_round"
android:supportsrtl="true"
android:theme="@style/AppTheme">
<activity android:name=".MainActivity">
<intent-filter>
<action android:name="android.intent.action.MAIN">
<category android:name="android.intent.category.LAUNCHER">
</category></action></intent-filter>
</activity>
<service android:name=".MyFirebaseInstanceIDService">
<intent-filter>
<action android:name="com.google.firebase.INSTANCE_ID_EVENT">
</action></intent-filter>
</service>
<service android:name=".MyFirebaseMessagingService"
android:permission="com.google.android.c2dm.permission.SEND">
<intent-filter>
<action android:name="com.google.firebase.MESSAGING_EVENT">
<action android:name="com.google.android.c2dm.intent.RECEIVE">
</action></action></intent-filter>
</service>
</application>
</uses-permission>
</uses-permission>
</manifest>
To handle the device registration process, MyFirebaseInstanceIDService
must increase the FireBaseInstenside service class. Under this service, override the tokenrefresh()
method so that whenever the system decides to refresh the tokens, it will be requested. This usually happens when the user installs/reinstalls the application or when the user clears the application data.
Since you are sending notifications between devices, each user must subscribe to an issue with a different user_id
. This ensures that users receive notifications sent to topics that match their user_id
. Here is the implementation of MyFirebaseInstanceIDSericiclass
.
public class MyFirebaseMessagingService extends FirebaseMessagingService {
private final String ADMIN_CHANNEL_ID = "admin_channel";
@Override
public void onMessageReceived(RemoteMessage remoteMessage) {
final Intent intent = new Intent(this, MainActivity.class);
NotificationManager notificationManager = (NotificationManager)
getSystemService(Context.NOTIFICATION_SERVICE);
int notificationID = new Random().nextInt(3000);
/*
Apps targeting SDK 26 or above (Android O) must implement notification channels and add their notifications to at least one of them.
Therefore, confirm if the version is Oreo or higher, then setup notification channel
*/
if (android.os.Build.VERSION.SDK_INT >= android.os.Build.VERSION_CODES.O) {
setupChannels(notificationManager);
}
intent.addFlags(Intent.FLAG_ACTIVITY_CLEAR_TOP);
PendingIntent pendingIntent = PendingIntent.getActivity(this, 0, intent, PendingIntent.FLAG_ONE_SHOT);
Bitmap largeIcon = BitmapFactory.decodeResource(getResources(), R.drawable.notify_icon);
Uri notificationSoundUri = RingtoneManager.getDefaultUri(RingtoneManager.TYPE_NOTIF CATION);
NotificationCompat.Builder notificationBuilder = new NotificationCompat.Builder(this, ADMIN_CHANNEL_ID)
.setSmallIcon(R.drawable.notify_icon)
.setLargeIcon(largeIcon)
.setContentTitle(remoteMessage.getData().get("title"))
.setContentText(remoteMessage.getData().get("message"))
.setAutoCancel(true)
.setSound(notificationSoundUri)
.setContentIntent(pendingIntent);
// Set notification color to match your app color template
if (Build.VERSION.SDK_INT >= Build.VERSION_CODES.LOLLIPOP) {
notificationBuilder.setColor(getResources().getColor(R.color.colorPrimaryDark));
}
notificationManager.notify(notificationID, notificationBuilder.build());
}
@RequiresApi(api = Build.VERSION_CODES.O)
private void setupChannels(NotificationManager notificationManager) {
CharSequence adminChannelName = "New notification";
String adminChannelDescription = "Device to device notification ";
NotificationChannel adminChannel;
adminChannel = new NotificationChannel(ADMIN_CHANNEL_ID,
adminChannelName,
NotificationManager.IMPORTANCE_HIGH);
adminChannel.setDescription(adminChannelDescription);
adminChannel.enableLights(true);
adminChannel.setLightColor(Color.RED);
adminChannel.enableVibration(true);
if (notificationManager != null) {
notificationManager.createNotificationChannel(adminChannel);
}
}
}
Step 3: Implement the notification sending logic
This is the most important part of the whole article. This is where you define the content of the instruction and how it will be modeled. However, before you dive into coding, follow these steps to get your server key from the Firebase console.
Navigate to the Cloud Messaging tab, and copy your Server key
Implement the Sending Logic: An FCM server with the following request properties only needs an HTTP post request to send a push notification:
Method Type: POST
URL: https://fcm.googleapis.com/fcm/send
Headers:
Authorization: key="Firebase server key" Content-Type: application/json
Body:
{
"to": "/topics/notification_userId",
"data": {
"title": "Notification title",
"message": "Notification message",
"key1" : "value1",
"key2" : "value2" //additional data you want to pass
}
}
With these concepts in mind, you will first create a JsonObject of Notification body within your activity class. This object budget will contain the subject of the receiver, the title of the notification, the notification message, and the other key/value pair you want to add.
public class MainActivity extends AppCompatActivity {
EditText edtTitle;
EditText edtMessage;
final private String FCM_API = "https://fcm.googleapis.com/fcm/send";
final private String serverKey = "key=" + "Your Firebase server key";
final private String contentType = "application/json";
final String TAG = "NOTIFICATION TAG";
String NOTIFICATION_TITLE;
String NOTIFICATION_MESSAGE;
String TOPIC;
@Override
protected void onCreate(Bundle savedInstanceState) {
super.onCreate(savedInstanceState);
setContentView(R.layout.activity_main);
edtTitle = findViewById(R.id.edtTitle);
edtMessage = findViewById(R.id.edtMessage);
Button btnSend = findViewById(R.id.btnSend);
btnSend.setOnClickListener(new View.OnClickListener() {
@Override
public void onClick(View v) {
TOPIC = "/topics/userABC"; //topic must match with what the receiver subscribed to
NOTIFICATION_TITLE = edtTitle.getText().toString();
NOTIFICATION_MESSAGE = edtMessage.getText().toString();
JSONObject notification = new JSONObject();
JSONObject notifcationBody = new JSONObject();
try {
notifcationBody.put("title", NOTIFICATION_TITLE);
notifcationBody.put("message", NOTIFICATION_MESSAGE);
notification.put("to", TOPIC);
notification.put("data", notifcationBody);
} catch (JSONException e) {
Log.e(TAG, "onCreate: " + e.getMessage() );
}
sendNotification(notification);
}
});
}
private void sendNotification(JSONObject notification) {
...
}
}
The next step is to request the network server using the library volley, then use the parameters to the root server will request notification on the target device.
public class MainActivity extends AppCompatActivity {
....
private void sendNotification(JSONObject notification) {
JsonObjectRequest jsonObjectRequest = new JsonObjectRequest(FCM_API, notification,
new Response.Listener() {
@Override
public void onResponse(JSONObject response)
{
Log.i(TAG, "onResponse: " + response.toString());
edtTitle.setText("");
edtMessage.setText("");
}
},
new Response.ErrorListener() {
@Override
public void onErrorResponse(VolleyError error) {
Toast.makeText(MainActivity.this, "Request error", Toast.LENGTH_LONG).show();
Log.i(TAG, "onErrorResponse: Didn't work");
}
}){
@Override
public Map getHeaders() throws AuthFailureError {
Map params = new HashMap<>();
params.put("Authorization", serverKey);
params.put("Content-Type", contentType);
return params;
}
};
MySingleton.getInstance(getApplicationContext()).addToRequestQueue(jsonObjectRequest);
}
}
Finally, add a MySingleton class that will serve as a request queue for instruction requests.
public class MySingleton {
private static MySingleton instance;
private RequestQueue requestQueue;
private Context ctx;
private MySingleton(Context context) {
ctx = context;
requestQueue = getRequestQueue();
}
public static synchronized MySingleton getInstance(Context context) {
if (instance == null) {
instance = new MySingleton(context);
}
return instance;
}
public RequestQueue getRequestQueue() {
if (requestQueue == null) {
// getApplicationContext() is key, it keeps you from leaking the
// Activity or BroadcastReceiver if someone passes one in.
requestQueue = Volley.newRequestQueue(ctx.getApplicationContext());
}
return requestQueue;
}
public void addToRequestQueue(Request req) {
getRequestQueue().add(req);
}
}
With it, you're done creating your app. You can start sending push notifications between devices without typing any server-side code. Always make sure that the notification will not be delivered to you if the subject of the recipient is correct. If you do everything right, you will get the same result.