Our Latest Blog Posts

latest-post

Businesses are always looking for new ways to improve efficiency and promote smoother customer service. A relatively new trend that has become popular over the past several years is using ChatGPT, a next-level chatbot based on OpenAI's language models. ChatGPT humanizes responses with a chorus of text. Text responses are human-made personas. This often quickly revolutionizes how businesses interact with their customers.

Understanding the Role of ChatGPT in Business

So, let us start with the basics of ChatGPT before discussing how to customise it and what it can do for you. ChatGPT is a question answering language model that leverages the power of deep learning algorithms to craft human-like responses for addressing user queries. These models utilise a huge dataset of text from the internet to produce coherent and contextually related answers.

One of the most important strengths of ChatGPT is its ability to perform a diverse range of functions, such as responding to FAQs or giving suggestions. Businesses spanning a broader array of industries could utilise it in different ways thanks to its flexibility.

The Basics of ChatGPT

How does ChatGPT work with input and output? Users will type in their questions or ask the chatbot, and ChatGPT then replies with a suitable answer based on its understanding of all text. Usually facilitated by a chat interface built into a website or app.

ChatGPT's amazing ability to mimic human conversation often convinces users that they are talking to a real person. Human-like behaviour is made possible by a combination of pre-training on a wide range of text data and fine-tuning on specific custom datasets.

The Importance of Customization in Chatbots

Even though ChatGPT provides a powerful out-of-the-box solution, customization is an essential part of leveraging its full potential for business use. Adjusting the chatbot to your brand’s tone and specific needs is effective for improving customer satisfaction and making the human-computer interaction more personalised.

First, customization helps businesses in creating a chatbot that fits their brand needs. Over time, a chatbot is likely to communicate with hundreds or thousands of customers, and for a business, it is important to retain a high level of customer recognising the brand. A well-customised chatbot will speak with a customer using a language, tone, and style specific to a brand, and this will positively affect the customer recognition of a brand.

Second, customization is also highly useful for training ChatGPT to be a more competent assistant in a specific industry. For example, it can be trained on specific medical terms and how to respond to patients’ queries in the medical field. The same can be said about an e-commerce field: after customisation, an e-commerce chatbot will have a chance to provide a customer with more specific information, such as tailored product recommendations, based on their product-viewing history and preferences.

In conclusion, while customization is a time-consuming process, it can help to create a chatbot that is not a generic assistant, but a truly unique one. The benefits attached to this will be heard in the level of customer satisfaction, the level of efficiency, and business profitability.

The Process of Customizing ChatGPT

Customizing ChatGPT requires a systematic approach to prevent the situation where existing functionality is upset by new features before customisation is complete. We need to take a look at the various steps involved in configuring ChatGPT so that it can serve your specific needs:

Identifying Your Business Needs

Before embarking on the customization journey, it's crucial to identify your business objectives and how ChatGPT can help achieve them. Whether you aim to automate repetitive tasks, provide instant responses to customer queries, or foster engagement, having a clear understanding of your business needs sets the foundation for successful customization.

Moreover, conducting market research and analysing customer feedback can provide valuable insights into the type of interactions your audience expects. By understanding your target demographic and their preferences, you can tailor ChatGPT to deliver personalised and relevant responses, enhancing the overall user experience.

Tailoring ChatGPT to Your Business

The first step after defining your objectives is to customise ChatGPT to be relevant to your company and cater to its unique needs. To do so, you will need to provide the chatbot with training data appropriate to your sector and domain.

Utilising a custom dataset consisting of examples of contextually relevant questions and answers derived from your faculty and fine-tuning properties will aid in generating responses that are accurate and contextually relevant. Finally, the model’s capabilities should always be tested, and its performance should be refined over time.

You can also facilitate the flow of data and improve the chatbot’s functionality by connecting ChatGPT to your CRM system or other platforms. The AI model relies on data from a variety of sources to provide users with more personalised solutions and suggestions, which boosts customer satisfaction and results in repeat business.

Benefits of Using Custom ChatGPT

Custom ChatGPT has tons of benefits that can make it go a long way in improving your business operations and customer experience. Let’s discuss,

Enhancing Customer Service

Businesses that want to be successful have quality customer service or personalised functionality gates. ChatGPT can be tailor-made to understand what your customers are asking and answer them accordingly, thus optimising the support process and helping resolve issues faster.

Additionally, ChatGPTs capacity to handle a high number of concurrent conversations enables businesses to serve multiple customers at the same time, leading to an even faster response and, therefore, helping maintain greater customer satisfaction! Say a customer has an intricate situation that needs minute-by-minute support. Not only does Custom ChatGPT know how to read the problem precisely, but it can also look for solutions piece by piece gratifying an enhanced customer service experience.

Streamlining Business Operations

With a Custom ChatGPT, internal operations can also turnaround as automating repetitive tasks and helping employees in their day-to-day jobs are some of the ways it can make an impact. By scheduling the appointment to give reports, these boring and tedious tasks can be done with ease from Chatbots freeing hours of workforce time so that your team can spend more energy on real work.

In addition to this, integrating ChatGPT with your CRM system means the chatbot can update you in real-time as customers interact and offer preferences or feedback. This kind of smooth integration helps various departments within an organization to manage data more efficiently and make better-informed decisions, ultimately leading to increased operational efficiency.

Potential Challenges and Solutions with Custom ChatGPT

The ability to customise ChatGPT is full of promise, however, there are limitations and hurdles that businesses should be mindful of as they start using it. Here, I will explain about two key issues along with their solutions,

Addressing Common Concerns

A typical fear with AI chatbots is that it can produce inaccurate outcomes which might lead to incorrect and misleading information. In order to offset this, businesses should establish sufficient testing coverage so as to approve the replies provided by ChatGPT. Monitoring, feedback loops and the escalation process are designed so that anything there is out of spec can be identified in near real time.

Reliability and accuracy of the answers that are given by AI chatbots is an essential thing to consider both for maintaining trust with customers keeping their satisfaction level high. This directly improves the responses ability which in turn making it more relevant to the new situation being discussed, for a business that employs chatbot developers and having them actively manage by continually updating training data gets better performance out of their chatbots. Also, a human-in-the-loop mechanism that allows the interference of manpower is also an additional layer for ensuring data quality.

Overcoming Implementation Hurdles

Although challenging, it is possible to roll out a custom version of ChatGPT by businesses that have little or no experience in AI implementations. That said, it becomes far easier to implement when working alongside established AI solution providers. These specialists can walk you through implementation and customization, provide the necessary training to your team to utilize it effectively, and constant support for managing change.

In addition, doing the proper research and analysis of your unique business needs prior to jumping into customization ensures as smooth a process as possible and avoids unnecessary roadblocks along way. When you work hand in glove with the AI-solution provider to set specific goals, develop KPIs and lay out a clear path it makes sure that whatever customization effort has been done is perfectly aligned with your business objectives.

Future Trends in Chatbot Technology

The evolution of chatbot technology continues to shape the future of customer interactions. Here are two trends that are expected to drive the development of custom ChatGPT:

AI and Machine Learning in Chatbots

The utilisation of AI and machine learning in chatbots renders them with the ability to learn from user interactions and become personalised over time. This journey of learning from transactions helps in enhancing the accuracy and responsiveness of your chatbot, thereby turning into a more dependable tool for businesses.

The Future of Custom ChatGPT in Business

With the development of technology, every successful business may profit significantly from using custom ChatGPT. No matter if it is used for creating unique marketing campaigns or more efficient support systems, it is apparent that the tool will help businesses interact with their customers better and, in some cases, be the defining factor of success.

Over the next several years, demand for chatbots such as with ChatGPT are expected to soar even higher, given an increasing portion of shopping and socialisation now occurs online. The world is coming to think of chatbots with AI and machine learning that can provide real-time personalised responses to customers on the GO from businesses.

Custom ChatGPT is far more than just the future of customer service. Modern healthcare, education, and plenty of other industries are now actively using chatbots to improve the efficiency of services, organise information in more digestible ways, and simply create exciting user experiences. This tool’s flexibility and adaptability will allow it to take the leading positions in numerous fields and adapt to the new requirements demanded by these industries.

Would you like to be among the first to try this innovation? Then try InfyGPT today!

September 07, 20249 minutesuserAnkit Kalathiya

Posts

Performance Testing Part-1

What is Performance Testing?

Performance testing, which is a non-functional testing method performed to determine system parameters in terms of responsiveness and stability under various workloads. Performance testing measures the quality characteristics of a system, such as a scalability, reliability, and resource use.

Types of Performance Testing

2021-07-01-60dd6e2e103a8

There are mainly six types of performance testing Let's see in detail.

Load Testing

It is the simplest form of testing conducted to understand the behavior of the system under a specific load. The load tests will determine the measurement of important business-critical transactions and will also monitor the load on the database, application server, etc.

Stress Testing

It is performed to find the upper limit capacity of the system and also to determine how the system is operating if the current load greatly exceeds the expected maximum.

Spike Testing

The Spike test is performed by suddenly increasing the number of users by a very large amount and measuring system performance. The main objective is to determine whether the system will be able to carry the workload.

Scalability testing

It Measures performance based on the software's ability to increase or decrease performance measurement attributes. For example, a scalability test could be performed based on the number of user requests.

Volume Testing

Under large test volume no. From. The data is filled in a database and the overall behavior of the program system is monitored. The goal is to check the performance of the software application under different database sizes.

Endurance Testing

It is done to make sure the software can handle the expected load over a long period of time.

We will see full performance testing process points in our next article, to continue...

January 11, 20211 minuteauthorBhumi Khimani
Which Logo File Format to Use Part-2

GIF logo file formats are not as widely used as they once were. They have a very limited color spectrum (only 256 colors out of millions in JPG) so solid color logos are a good candidate for this format. A special feature of the GIF file is that it supports smooth animation. You can create frames with frame animations and file sizes will be negligible as long as you keep the color flat and smooth (from red to blue). GIF files are pixel-based and do not expand well.

logo

EPS and AI logo file formats are a sacred grail of file formats. They are made up of dots and lines, not pixels, allowing infinite scaling and expansion without losing quality. Many business owners and executives ignore these logo file formats because they cannot open them normally. Many common MS Office fee programs do not open the EPS logo file format. EPS files can also support pixels, which also makes this file format difficult. Software such as Adobe Illustrator, InDesign, or Photoshop can work with this file format and optimize and save almost any logo file format you need. Illustrator will allow resizing, color mode change, and more.

PDF logo file formats can also be difficult as PDF color mode can disguise spectra and resolution. Some common office fee software will open or import PDFs but one way to tell if the resolution is good is to zoom in very closely to the logo. If the edges stay crisp, you’re in business and a graphic designer who can use something in print and digital applications. If the edges become blurred or pixelated, you will be limited in the use and extension of this particular logo file format.

SVG files have become more common on websites and digital access and are considered the standard format for displaying vector graphics on the web. SVG logo file formats allow a resizable logo format that does not lose image quality as it is expanded or reduced. This is especially important with responsive web design where the logo file can be resized depending on the digital device the website is viewing. Another major advantage for the SVG logo file format is the relatively small file size - which allows a digital file to load on a website very quickly. Support is limited to SVG but website design is an important place for their use.

January 08, 20212 minutesauthorKishan Savaliya
How to Generate Sales Leads

Many successful small business owners are constantly looking to expand their customer base and grow their businesses. However, business growth can be a difficult and long-term process. One of the key elements of growing a business is constant access to a steady stream of sales leads. A lead is a person or business if you have a company that sells to other businesses that are interested in the products or services you sell.

Here are some tips for building a system that will help you identify sales leads in your small business, and - with the right focus and effort - turn them into customers.

1. Increase your engagement with your customers

Relationships are all about sales and talking to the people who reach out to you to do so. For example, when people reach you with questions about your product or company, instead of just mentioning them on your blog, you can ask them if they mind having a quick chat with you.

2. Constantly refresh your email lists

It is impossible to generate leads from an old email list that contains incorrect information or does not match the parameters of your target person. If you haven't cleaned up your email list for a while, you may still be cold-emailed people who are already your customers.

3. Use chatbots on your website

Customers want to do business with companies that respond promptly to questions. Although companies respond within 12 hours on average, research shows that consumers expect responses within 1 hour. You might think, "Well, but they know we're not working right now," or, "They'll surely understand that we're in another realm of time." While customers can understand and understand later, there are thousands of businesses offering services just like yours, so you don't want to take that opportunity.

4. Join and participate in social media groups

LinkedIn and Facebook are great places to connect with other professionals, share your skills, and find leads. Once you join a group, don't start by pitching members as this can cause people to separate. Instead, do the following to establish a relationship:

  • Start a conversation
  • Engage in other people's conversations
  • People appreciated their content and the events they were planning to organize

Once the group members recognize you, you can use the platform to generate interest in your products.

5. Use SEO to increase website traffic

High ranking your website in search results will increase your website traffic. To get a better rank, you must do search engine optimization on your website. Some of the basics of SEO include:

  • Keyword optimization on both landing pages and blog content
  • Constantly great content post
  • Link building

Again, it is important to point out that SEO and content creation can be technical and time-consuming.

6. Create a sales funnel

Once you know who you are targeting and decide how to reach them, you need to have a plan to collect contact information. The first part of the process involves funneling all prospects into a standard form or landing page that encourages them to share their contact information, usually in exchange for a free gift, coupon, sample, or any other value-added incentive.

7. Use an email newsletter to build relationships

Now that you’re in touch with prospects, it’s time to cultivate those relationships so you can take them from the lead stage through sales (and ultimately repeat sales). One of the best ways to keep in touch with your prospects is through an email newsletter.

January 05, 20213 minutesauthorAnkit Kalathiya
How to do payments with stripe checkout

Payments gateways are very useful components of any e-commerce store. One of the popular payment gateways is Stripe. it's becoming more popular nowadays.

Stripe's simple definition is :

We bring together everything that’s required to build websites and apps that accept payments and send payouts globally. Stripe’s products power payments for online and in-person retailers, subscription businesses, software platforms and marketplaces, and everything in between. ~ Stripe

To begin this laravel tutorial, I hope you already have fresh laravel repo.

Stripe Configuration with Laravel

Run the following command to install stripe :

composer require stripe/stripe-php

if you don't have a Stripe account, you'll want to set that up and add your API keys. Add the following to your .env file.

STRIPE_KEY=your-stripe-key
STRIPE_SECRET=your-stripe-secret

Publish Migrations Files From Stripe

php artisan vendor:publish --tag="cashier-migrations" 

And Run migrations by hitting the following command

php artisan migrate 

Setup Stripe Controller

Now create a stripe controller by hitting the following command:

php artisan make:controller StripeController
namespace App\Http\Controllers;
use Illuminate\Contracts\View\Factory;
use Illuminate\Http\JsonResponse;
use Illuminate\Http\RedirectResponse;
use Illuminate\Http\Request;
use Stripe\Checkout\Session;
use Stripe\Exception\ApiErrorException;
/**
 * Class FeaturedCompanySubscriptionController
 */
class StripeControlle extends AppBaseController
{
    public function createSession(Request $request)
    {
        setStripeApiKey();
        $session = Session::create([
            'payment_method_types' => ['card'],
            'customer_email'       => $userEmail,
            'line_items'           => [
                [
                    'price_data'  => [
                        'product_data' => [
                            'name' => 'Make '.$company->user->first_name.' as featured Company',
                        ],
                        'unit_amount'  => 100 * 100,
                        'currency'     => 'USD',
                    ],
                    'quantity'    => 1,
                    'description' => '',
                ],
            ],
            'client_reference_id'  => '1234',
            'mode'                 => 'payment',
            'success_url'          => url('payment-success').'?session_id={CHECKOUT_SESSION_ID}',
            'cancel_url'           => url('failed-payment?error=payment_cancelled'),
        ]);
        $result = [
            'sessionId' => $session['id'],
        ];
        return $this->sendResponse($result, 'Session created successfully.');
    }
    public function paymentSuccess(Request $request)
    {
        $sessionId = $request->get('session_id');
        // 
    }

    public function handleFailedPayment()
    {
        // 
    }
}

Define Routes

    Route::post('stripe-charge', 'StripeController@createSession');
    Route::get('payment-success', 'StripeController@paymentSuccess');
    Route::get('failed-payment',  'StripeController@handleFailedPayment');

Setup From View file

Here we are going to create stripe session from the backend and redirect to the stripe checkout page once we will receive the sessionId from the backend.

Assume that makePaymentURL is something like "APP_URL/stripe-charge".

Now let's say when you hit the submit form of stripe it will call MakePaymentURL and that URL returns your session ID which we will use to redirect to the stripe checkout page.

 $(document).on('click', '#makePayment', function () {

        $(this).addClass('disabled');
        $.post(makePaymentURL, payloadData).done((result) => {
            let sessionId = result.data.sessionId;
            stripe.redirectToCheckout({
                sessionId: sessionId,
            }).then(function (result) {
                $(this).html('Make Featured').removeClass('disabled');
                manageAjaxErrors(result);
            });
        }).catch(error => {
            $(this).html('Make Featured').removeClass('disabled');
            manageAjaxErrors(error);
        });
    });

That's it, after entering proper details into stripe you will get a success callback to a related route, where you can perform related actions.

January 02, 20212 minutesauthorVishal Ribdiya
How to add Shadow and Text on ImageView in Android

Basically, it works like a stack where each view is stacked on top of the other.

Create a drawable file for shadow view and assign the name image_shadow and add the below code in this file.

<?xml version="1.0" encoding="utf-8"?>
<shape xmlns:android="http://schemas.android.com/apk/res/android"
    android:shape="rectangle">
    <corners android:radius="10dp" />
    <gradient
    android:angle="270"
    android:centerX="300%"
    android:endColor="#99000000"
    android:startColor="#00000000"
    android:type="linear" />
    <size
    android:width="270dp"
    android:height="60dp" />
    <stroke
    android:width="1dp"
    android:color="#878787" />
</shape>

Now, open the XML file and add the below code into it, and set this drawable file as view background.

<androidx.appcompat.widget.LinearLayoutCompat
xmlns:android="http://schemas.android.com/apk/res/android"
xmlns:tools="http://schemas.android.com/tools"
android:layout_width="match_parent"
android:layout_height="match_parent"
xmlns:app="http://schemas.android.com/apk/res-auto"
tools:context=".MainActivity">
<androidx.constraintlayout.widget.ConstraintLayout
    android:layout_width="match_parent"
    android:layout_height="match_parent">
    <androidx.appcompat.widget.AppCompatImageView
        android:id="@+id/imageView"
        android:layout_width="250dp"
        android:layout_height="250dp"
        android:scaleType="centerCrop"
        android:src="@drawable/shopping_image"
        app:layout_constraintTop_toTopOf="parent"
        app:layout_constraintEnd_toEndOf="parent"
        app:layout_constraintStart_toStartOf="parent"
        app:layout_constraintBottom_toBottomOf="parent"/>
    <View android:id="@+id/view"
        android:layout_width="250dp"
        android:layout_height="250dp"
        android:background="@drawable/image_shadow"
        app:layout_constraintTop_toTopOf="parent"
        app:layout_constraintEnd_toEndOf="parent"
        app:layout_constraintStart_toStartOf="parent"
        app:layout_constraintBottom_toBottomOf="parent"/>
    <androidx.appcompat.widget.AppCompatTextView
        android:layout_width="wrap_content"
        android:layout_height="wrap_content"
        android:layout_margin="10dp"
        android:textColor="@android:color/white"
        android:text="Write your text here"
        android:textSize="25sp"
        app:layout_constraintStart_toStartOf="parent"
        app:layout_constraintEnd_toEndOf="parent"
        app:layout_constraintBottom_toBottomOf="@+id/view"/>
</androidx.constraintlayout.widget.ConstraintLayout>
</androidx.appcompat.widget.LinearLayoutCompat>

That's it. You should be ready to go.

December 31, 20201 minuteauthorVivek Beladiya
Show saved annotations from database in document using PDFTron

Here we will learn how to import annotations saved in the database using PDFTron.

In my last blog, we have learned how to save annotations in the database.

Events for import annotation

At the time of document load, we will get all annotations saved in the database using AJAX call and then we'll import that annotation. Now the question is if we import annotation then that will be drawn and again annotation changed event will fire and again annotation will be saved (as I say in my last blog), so this will become an infinite flow, but we can overcome this problem by checking if an annotation is imported or not. If an annotation is not imported then only we'll save annotation in the database process otherwise we'll ignore it.

When we draw any annotation, the "annotationChanged" event will be fired, and check if it is an imported annotation, then we can ignore it(eg, save annotation process).

Here is an example of how to import annotations from the database.

Example

WebViewer({
    path: 'path_to_the_PDFTron_'lib'_folder_on_your_server',
    css: 'webviewer_css',
    licenseKey: 'YOUR_PDF_TRON_LICENSE_KEY',
    initialDoc: 'YOUR_FILE URL' //url of a file to load
}, document.getElementById('viewer'))
    .then(function (instance) {
        let docViewer = instance.docViewer;
        let annotManager = instance.annotManager;

        annotManager.on('annotationChanged', (annots, action, e) => {
            //if annotation is imported we'll return
            if (e.imported) return;
            //when document will loaded we'll get annotations fro db
            docViewer.on('documentLoaded', function () {
                $.ajax({
                    url: `URL_TO_SAVE_ANNOTATION`,
                    type: 'GET',
                    success: function (result) {
                        if (result.success) {
                            result.data.forEach(annotationObj => {

      annotManager.importAnnotations(annotationObj.annotation);
                            });
                        }
                    },
                    error: function (result) {
                        console.log(result);
                    }
                });
            });
        });
    });
December 28, 20201 minuteauthorMonika Vaghasiya
How to increase 10 X sales

Simply put, the rule of 10 X is taking any target you set for your company or sales team, and multiplying it by 10.

So if the goal is to increase revenue by 5% using the 10X rule, you will increase that goal to 50%.

What the 10X rule does is force you and your sales team to think in terms of LEVERAGE. Because all of a sudden, instead of focusing on the “real” goal, the goal is achieved through the roof.

Contact customer acquisition with a solid plan. Build a foundation by developing relationships with your target audience.

Achieve customers differently as you progress toward strategic goals. Here are four lessons to guide your team:

1. Create an engagement

It is highly unlikely that a first time visitor will stumble upon your website and automatically purchase your products. Potential customers should be fully engaged with your brand before making a purchase.

2. Be present on social media

If you are not present on social media, you are lost in a huge market that your competitors are already taking advantage of.

Having a social media presence should also not be expensive. Creating a business account on Facebook, Twitter, Instagram, and LinkedIn is free. Just join discussions and groups related to your industry. Provide helpful answers to questions and insights on various posts to make yourself known.

3. Keep your sales simple

Everyone is on sale, even if your job or business has no impact, Cardo told those in attendance. And many entrepreneurs and professionals overreact to it.

Sales is a game of touch. It’s about finding someone who can buy, who has the power to make decisions, and who is interested. Then you contact them with offer fur, talk price, and ask. It's not always easy, though it's really easy. The most successful salespeople focus on simplifying their sales process.

4. Put your problem customers

We have it all - the customers that we meet today or in the future take up more of our time for business.

5. All your customers are committed to staying in touch after purchasing from you

Keep an eye out for ways you can sell them extra items. Don’t keep your customers engaged to monopolize your time, but you can help them gain an understanding of strategy opportunities.

6. Host an event

Hosting an event is a great way to do this because it gives potential customers the opportunity to meet your brand on a more personal level. Depending on your product or service, you can either host a personal event where customers can meet you or host an online webinar where it still feels personal - just like you are in front of your audience.

December 26, 20202 minutesauthorAnkit Kalathiya
Which Logo File Format to Use Part-1

Multiple logo file formats

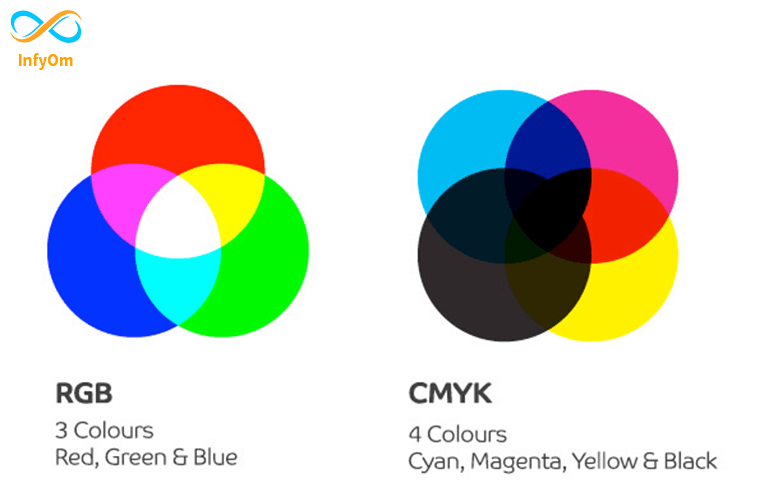
Digital logo applications such as websites and anything seen on the screen use the RGB color spectrum. This color spectrum is more varied than standard printed material so digitally used logo files are designed a little differently. They usually do not require high-resolution art and are not limited to one color.

The printed logo application like printed brochures, business cards, T-shirts, decals, folders, and ink on paper is 99% of the time prepared with CMYK and Pantone color spectrum. This spectrum is handled differently than a digital application and requires high resolution so that it looks crisp when printed on paper.

Logo File Formats

Logo file formats can come in many shapes and sizes. The format is driven by how it will be used, now and in the future, as well as what the logo looks like. When your logo designer provides the digital file formats to you, place them somewhere secure so you do not misplace them and can consistently reference the files. Below are common logo file formats that cover 99% of all logo marketing applications.

  • JPG
  • PNG
  • GIF
  • EPS
  • AI
  • PDF
  • SVG

2021-01-09-5ff9332db7b83

Which logo file formats are most common?

It is very common to have JPG or PNG logo file formats. This is most common because of many programs such as Word and PowerPoint import/drop. When you use these file formats on the screen, it is mostly acceptable. But have you ever tried to enlarge one of these file formats and the logo starts to get blurred or pixelated? This is because these formats are pixel-based and limited in how much they can be expanded before image quality deteriorates.

2021-01-09-5ff933446afc1

Breakdown of logo file formats and their best uses

The use of JPG (or JPEG) does not require digital and print, as it is the RGB and CMYK color space. If you don't have software like Photoshop, it creates colorful spots. One way to determine which large size JPG logo file can be used is to drag and drop the logo into your web browser window; You can use a digital app and some small print apps when viewing four or five-inch spots or more logos. JPG files are pixel-based and can be quite large. They also do not support PNG (listed below) as a demonstration background.

PNG Logo files are good for placing your logo on a photo above a photo or on a colored background in a digital app as it supports transparency. PNG logo file formats are widely supported on websites. PNG for any printed projects. Do not use files. PNG files are pixel-based and do not expand well.

November 24, 20202 minutesauthorKishan Savaliya