
Android 7.0 (API Level 24) provides support for multilingual users, allowing users to select multiple locales in the setting. The locale object budget represents a specific geographic, political, or cultural area.
Operations that require this locale to perform a task are called locale-sensitive and use that locale to generate information for the user.
Step 1: Create A New Project & Create Resource Files
To create a new project in Android Studio.
In this step, we need to create a string resource file for the Gujarati language.Go to app > res > values > right-click > New > Value Resource File and name it as strings.
Now, we have to select the qualifier as a locale from the available list and select the language as Gujarati from the drop-down list. Below is a picture of the steps.

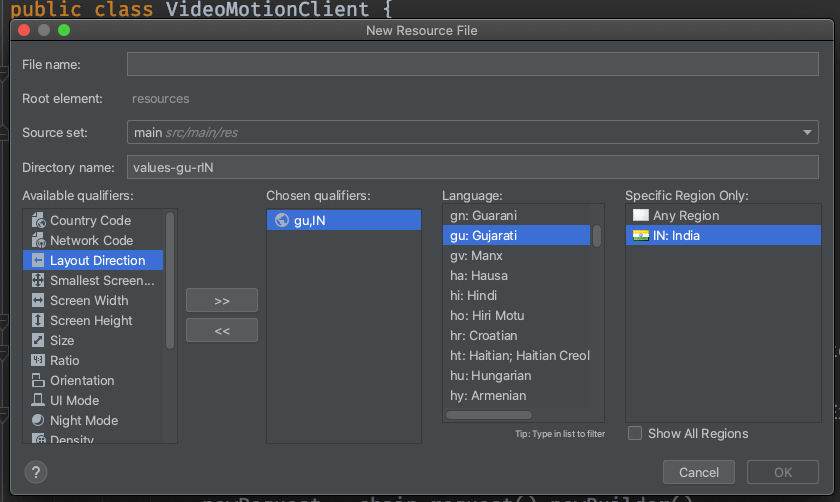
Now, in this resource file, strings.xml(gu-rlN) add the code given below.
					<resources>
    <string name="app_name">Change App Language</string>
    <string name="selected_language">ગુજરાતી</string>
    <string name="language">કેમ છો</string>
</resources>
And add this line to the string.xml file, which is the default for English.
					<resources>
    <string name="app_name">Change App Language</string>
    <string name="selected_language">English</string>
    <string name="language">How are you</string>
</resources>
Step 2: Create The Layout File For The Application
In this step, we will create a layout for our application. Go to applications> res> Layout> activity_main.xml and add two text views, one for the message and one for the selected language, and an image view for the drop_down icon. Below is the code snippet for the activity_main.xml file.
					<?xml version="1.0" encoding="utf-8"?>
<LinearLayout
    xmlns:android="http://schemas.android.com/apk/res/android"
    xmlns:app="http://schemas.android.com/apk/res-auto"
    xmlns:tools="http://schemas.android.com/tools"
    android:layout_width="match_parent"
    android:layout_height="match_parent"
    android:orientation="vertical"
    tools:context=".MainActivity">

    <TextView
        android:id="@+id/textView"
        android:layout_width="match_parent"
        android:layout_height="wrap_content"
        android:layout_margin="48dp"
        android:text="Welcome To InfyOm"
        android:textAlignment="center" />

    <Button
        android:id="@+id/btnGujarati"
        android:layout_margin="16dp"
        android:background="@color/colorPrimary"
        android:textColor="#ffffff"
        android:layout_width="wrap_content"
        android:layout_height="wrap_content"
        android:text="Gujarati"/>

    <Button
        android:id="@+id/btnEnglish"
        android:layout_margin="16dp"
        android:background="@color/colorPrimary"
        android:textColor="#ffffff"
        android:layout_width="wrap_content"
        android:layout_height="wrap_content"
        android:text="English"/>

</LinearLayout>
Step 3: Create LocaleHelper Class
Now, we will create a local helper class. This class has all the functions that will help to change the language at runtime. Go to app > java > package > right-click and create a new Java class and name it LocalHelper. Below is the code for the local helper class.
					import android.annotation.TargetApi;
import android.content.Context;
import android.content.SharedPreferences;
import android.content.res.Configuration;
import android.content.res.Resources;
import android.os.Build;
import android.preference.PreferenceManager;

import java.util.Locale;

public class LocaleHelper {
        private static final String SELECTED_LANGUAGE = "Locale.Helper.Selected.Language";

        // the method is used to set the language at runtime
        public static Context setLocale(Context context, String language) {
            persist(context, language);

            // updating the language for devices above android nougat
            if (Build.VERSION.SDK_INT >= Build.VERSION_CODES.N) {
                return updateResources(context, language);
            }
            // for devices having lower version of android os
            return updateResourcesLegacy(context, language);
        }

        private static void persist(Context context, String language) {
            SharedPreferences preferences =                       PreferenceManager.getDefaultSharedPreferences(context);
            SharedPreferences.Editor editor = preferences.edit();
            editor.putString(SELECTED_LANGUAGE, language);
            editor.apply();
        }

        // the method is used update the language of application by creating
        // object of inbuilt Locale class and passing language argument to it
        @TargetApi(Build.VERSION_CODES.N)
        private static Context updateResources(Context context, String language) {
            Locale locale = new Locale(language);
            Locale.setDefault(locale);

            Configuration configuration = context.getResources().getConfiguration();
            configuration.setLocale(locale);
            configuration.setLayoutDirection(locale);

            return context.createConfigurationContext(configuration);
        }

        @SuppressWarnings("deprecation")
        private static Context updateResourcesLegacy(Context context, String language) {
            Locale locale = new Locale(language);
            Locale.setDefault(locale);

            Resources resources = context.getResources();

            Configuration configuration = resources.getConfiguration();
            configuration.locale = locale;
            if (Build.VERSION.SDK_INT >= Build.VERSION_CODES.JELLY_BEAN_MR1) {
                configuration.setLayoutDirection(locale);
            }

            resources.updateConfiguration(configuration, resources.getDisplayMetrics());

            return context;
        }
    }
Step 4: Working With the MainActivity.java File
In this step, we will apply Java code to switch between string.xml files to use different languages. First, we will initialize all the views and set click behavior on an Alert dialog box to choose the desired language with the help of the LocalHelper class. Below is the code is given for the MainActivity.java class.
					import androidx.appcompat.app.AppCompatActivity;

import android.content.Context;
import android.content.res.Resources;
import android.os.Bundle;
import android.view.View;
import android.widget.Button;
import android.widget.TextView;

public class MainActivity extends AppCompatActivity {
    TextView messageView;
    Button btnGujarati, btnEnglish;
    Context context;
    Resources resources;

    @Override
    protected void onCreate(Bundle savedInstanceState) {
        super.onCreate(savedInstanceState);
        setContentView(R.layout.activity_main);

        messageView = (TextView) findViewById(R.id.textView);
        btnGujarati = findViewById(R.id.btnGujarati);
        btnEnglish = findViewById(R.id.btnEnglish);

        btnEnglish.setOnClickListener(new View.OnClickListener() {
            @Override
            public void onClick(View view) {
                context = LocaleHelper.setLocale(MainActivity.this, "en");
                resources = context.getResources();
                messageView.setText(resources.getString(R.string.language));
            }
        });

        btnGujarati.setOnClickListener(new View.OnClickListener() {
            @Override
            public void onClick(View view) {
                context = LocaleHelper.setLocale(MainActivity.this, "hi");
                resources = context.getResources();
                messageView.setText(resources.getString(R.string.language));
            }
        });

    }
}