Firebase Cloud Messaging (FCM) is a cross-platform messaging solution that lets you deliver messages for free.
It allows you to send push notifications from the Firebase console or from the application server or some trusted server where logic runs.
Step 1:- Create a new Android Studio Project
First, create a new Android Studio project and add the dependencies. First set up Firebase in your project. You can find a good tutorial.
Add Firebase messaging dependency to your app-level.
					build.Gradle
dependencies {
  implementation 'com.google.firebase:firebase-messaging:19.0.1'
}
Step 2: Create a Firebase Service
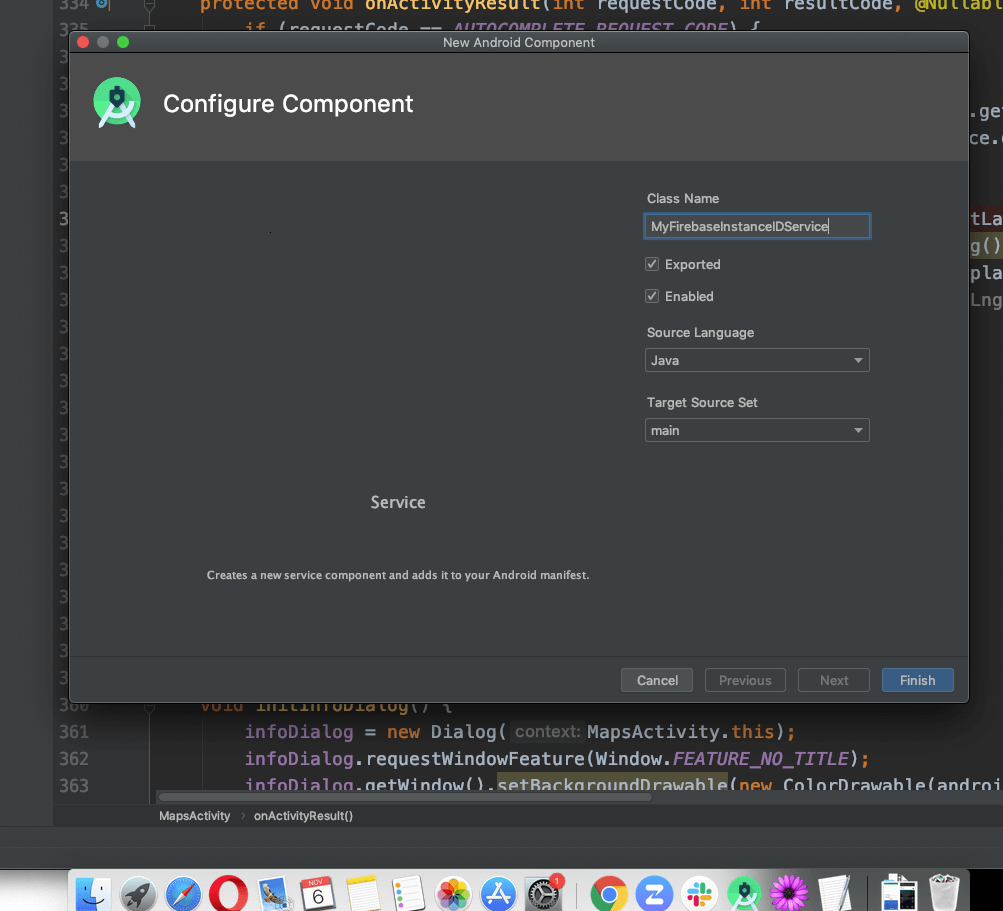
The next step is to create Firebase Services:- MyFirebaseInstanceIDService and MyFirebaseMessagingService. first MyFirebaseInstanceIDService service will handle the device registration process and the second MyFirebaseInstanceIDService will handle the reception and display of notifications. The services have no visual interface and are used for operations that run in the background. To create a service, right-click and select the Applications folder New -> Service -> Service.
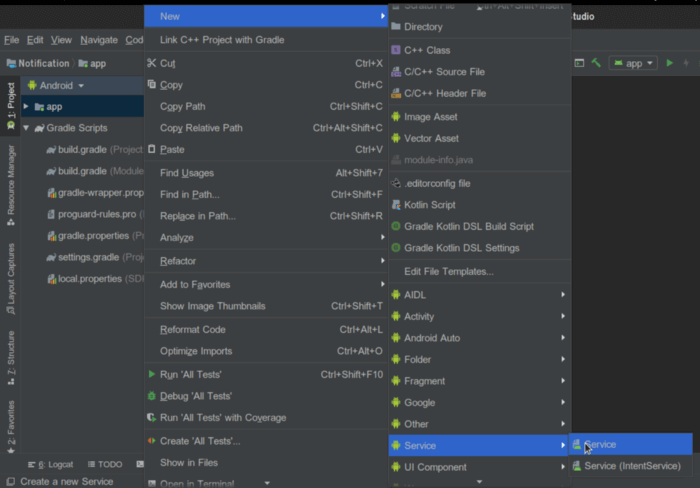
Type in your service name, and click the Finish button. Repeat the same steps for the second service.
AndroidManifest.xml file and update your service declarations under the application tag. Also, add INTERNET and CLOUD TO DEVICE MESSAGING permissions so your app can interact with the FCM server.
					<!--?xml version="1.0" encoding="utf-8"?-->
<manifest xmlns:android="http://schemas.android.com/apk/res/android" package="com.exmple.notify">

  <uses-permission android:name="android.permission.INTERNET">
  <uses-permission android:name="com.google.android.c2dm.permission.RECEIVE">

<application android:allowbackup="true"
android:icon="@mipmap/ic_launcher"
android:label="@string/app_name"
android:roundicon="@mipmap/ic_launcher_round"
android:supportsrtl="true"
android:theme="@style/AppTheme">
    <activity android:name=".MainActivity">
      <intent-filter>
        <action android:name="android.intent.action.MAIN">
        <category android:name="android.intent.category.LAUNCHER">
      </category></action></intent-filter>
    </activity>

    <service android:name=".MyFirebaseInstanceIDService">
      <intent-filter>
        <action android:name="com.google.firebase.INSTANCE_ID_EVENT">
      </action></intent-filter>
    </service>

    <service android:name=".MyFirebaseMessagingService"

android:permission="com.google.android.c2dm.permission.SEND">
      <intent-filter>
        <action android:name="com.google.firebase.MESSAGING_EVENT">
        <action android:name="com.google.android.c2dm.intent.RECEIVE">
      </action></action></intent-filter>
    </service>
  </application>
</uses-permission>
</uses-permission>
</manifest>
To handle the device registration process, MyFirebaseInstanceIDService must increase the FireBaseInstenside service class. Under this service, override the tokenrefresh() method so that whenever the system decides to refresh the tokens, it will be requested. This usually happens when the user installs/reinstalls the application or when the user clears the application data.
Since you are sending notifications between devices, each user must subscribe to an issue with a different user_id. This ensures that users receive notifications sent to topics that match their user_id. Here is the implementation of MyFirebaseInstanceIDSericiclass.
					public class MyFirebaseMessagingService extends FirebaseMessagingService {

  private final String ADMIN_CHANNEL_ID = "admin_channel";

  @Override
  public void onMessageReceived(RemoteMessage remoteMessage) {
    final Intent intent = new Intent(this, MainActivity.class);
    NotificationManager notificationManager = (NotificationManager)
getSystemService(Context.NOTIFICATION_SERVICE);
    int notificationID = new Random().nextInt(3000);
   /*
    Apps targeting SDK 26 or above (Android O) must implement notification channels and add their notifications to at least one of them.
Therefore, confirm if the version is Oreo or higher, then setup notification channel
   */
    if (android.os.Build.VERSION.SDK_INT >= android.os.Build.VERSION_CODES.O) {
      setupChannels(notificationManager);
    }

    intent.addFlags(Intent.FLAG_ACTIVITY_CLEAR_TOP);
    PendingIntent pendingIntent = PendingIntent.getActivity(this, 0, intent, PendingIntent.FLAG_ONE_SHOT);
    Bitmap largeIcon = BitmapFactory.decodeResource(getResources(), R.drawable.notify_icon);
    Uri notificationSoundUri = RingtoneManager.getDefaultUri(RingtoneManager.TYPE_NOTIF CATION);

    NotificationCompat.Builder notificationBuilder = new NotificationCompat.Builder(this, ADMIN_CHANNEL_ID)
        .setSmallIcon(R.drawable.notify_icon)
        .setLargeIcon(largeIcon)
        .setContentTitle(remoteMessage.getData().get("title"))
        .setContentText(remoteMessage.getData().get("message"))
        .setAutoCancel(true)
        .setSound(notificationSoundUri)
        .setContentIntent(pendingIntent);

    // Set notification color to match your app color template
    if (Build.VERSION.SDK_INT >= Build.VERSION_CODES.LOLLIPOP) {
      notificationBuilder.setColor(getResources().getColor(R.color.colorPrimaryDark));
    }
    notificationManager.notify(notificationID, notificationBuilder.build());
  }

  @RequiresApi(api = Build.VERSION_CODES.O)
  private void setupChannels(NotificationManager notificationManager) {
    CharSequence adminChannelName = "New notification";
    String adminChannelDescription = "Device to device notification ";

    NotificationChannel adminChannel;
    adminChannel = new NotificationChannel(ADMIN_CHANNEL_ID,
    adminChannelName,
    NotificationManager.IMPORTANCE_HIGH);

    adminChannel.setDescription(adminChannelDescription);
    adminChannel.enableLights(true);
    adminChannel.setLightColor(Color.RED);
    adminChannel.enableVibration(true);

    if (notificationManager != null) {
      notificationManager.createNotificationChannel(adminChannel);
    }
  }
}
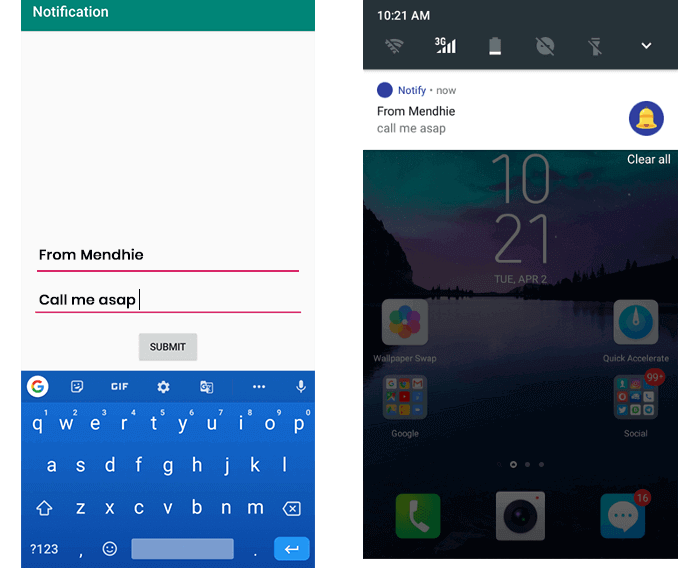
Step 3: Implement the notification sending logic
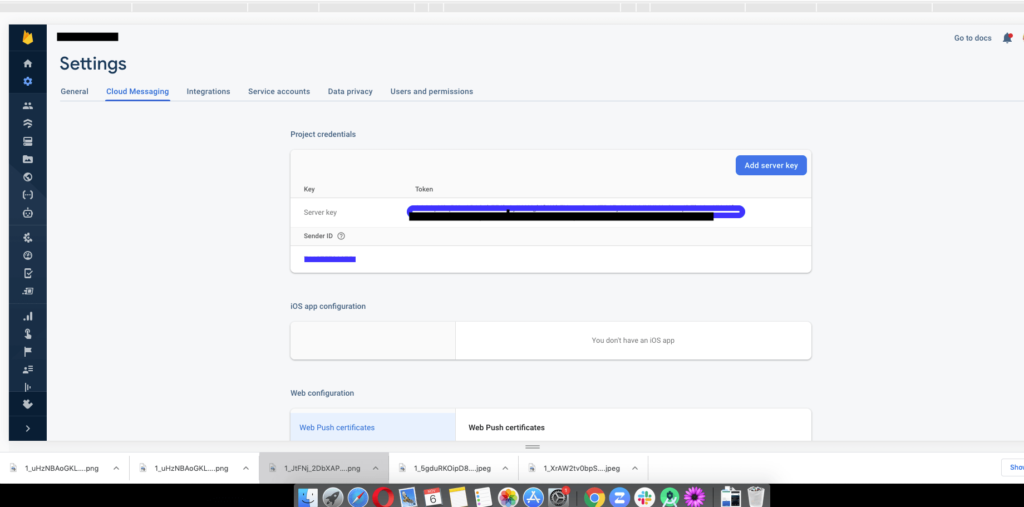
This is the most important part of the whole article. This is where you define the content of the instruction and how it will be modeled. However, before you dive into coding, follow these steps to get your server key from the Firebase console.
Navigate to the Cloud Messaging tab, and copy your Server key
Implement the Sending Logic: An FCM server with the following request properties only needs an HTTP post request to send a push notification:
Method Type: POST
URL: https://firebase.google.com/docs/cloud-messaging/http-server-ref
Headers:
Authorization: key=”Firebase server key” Content-Type: application/json
Body:
					{
 "to": "/topics/notification_userId",
 "data": {
  "title": "Notification title",
  "message": "Notification message",
  "key1" : "value1",
  "key2" : "value2" //additional data you want to pass
 }
}
With these concepts in mind, you will first create a JsonObject of Notification body within your activity class. This object budget will contain the subject of the receiver, the title of the notification, the notification message, and the other key/value pair you want to add.
					public class MainActivity extends AppCompatActivity {
  EditText edtTitle;
  EditText edtMessage;
  final private String FCM_API = "https://fcm.googleapis.com/fcm/send";
  final private String serverKey = "key=" + "Your Firebase server key";
  final private String contentType = "application/json";
  final String TAG = "NOTIFICATION TAG";

  String NOTIFICATION_TITLE;
  String NOTIFICATION_MESSAGE;
  String TOPIC;

  @Override
  protected void onCreate(Bundle savedInstanceState) {
    super.onCreate(savedInstanceState);
    setContentView(R.layout.activity_main);
    edtTitle = findViewById(R.id.edtTitle);
    edtMessage = findViewById(R.id.edtMessage);
    Button btnSend = findViewById(R.id.btnSend);

    btnSend.setOnClickListener(new View.OnClickListener() {
      @Override
      public void onClick(View v) {
        TOPIC = "/topics/userABC"; //topic must match with what the receiver subscribed to
        NOTIFICATION_TITLE = edtTitle.getText().toString();
        NOTIFICATION_MESSAGE = edtMessage.getText().toString();

        JSONObject notification = new JSONObject();
        JSONObject notifcationBody = new JSONObject();
        try {
          notifcationBody.put("title", NOTIFICATION_TITLE);
          notifcationBody.put("message", NOTIFICATION_MESSAGE);
          notification.put("to", TOPIC);
          notification.put("data", notifcationBody);
        } catch (JSONException e) {
          Log.e(TAG, "onCreate: " + e.getMessage() );
        }
        sendNotification(notification);
      }
    });
  }
  private void sendNotification(JSONObject notification) {
 ...
  }
}
The next step is to request the network server using the library volley, then use the parameters to the root server will request notification on the target device.
					public class MainActivity extends AppCompatActivity {

  ....

  private void sendNotification(JSONObject notification) {
    JsonObjectRequest jsonObjectRequest = new JsonObjectRequest(FCM_API, notification,
            new Response.Listener() {
              @Override
              public void onResponse(JSONObject response)
              {
                Log.i(TAG, "onResponse: " + response.toString());
                edtTitle.setText("");
                edtMessage.setText("");
              }
            },
            new Response.ErrorListener() {
              @Override
              public void onErrorResponse(VolleyError error) {
                Toast.makeText(MainActivity.this, "Request error", Toast.LENGTH_LONG).show();
                Log.i(TAG, "onErrorResponse: Didn't work");
              }
            }){
          @Override
          public Map getHeaders() throws AuthFailureError {
            Map params = new HashMap<>();
            params.put("Authorization", serverKey);
            params.put("Content-Type", contentType);
            return params;
          }
        };
    MySingleton.getInstance(getApplicationContext()).addToRequestQueue(jsonObjectRequest);
  }
}
Finally, add a MySingleton class that will serve as a request queue for instruction requests.
					public class MySingleton {
  private static MySingleton instance;
  private RequestQueue requestQueue;
  private Context ctx;

  private MySingleton(Context context) {
    ctx = context;
    requestQueue = getRequestQueue();
  }
  public static synchronized MySingleton getInstance(Context context) {
    if (instance == null) {
      instance = new MySingleton(context);
    }
    return instance;
  }
  public RequestQueue getRequestQueue() {
    if (requestQueue == null) {
      // getApplicationContext() is key, it keeps you from leaking the
      // Activity or BroadcastReceiver if someone passes one in.
      requestQueue = Volley.newRequestQueue(ctx.getApplicationContext());
    }
    return requestQueue;
  }
  public  void addToRequestQueue(Request req) {
    getRequestQueue().add(req);
  }
}
With it, you’re done creating your app. You can start sending push notifications between devices without typing any server-side code. Always make sure that the notification will not be delivered to you if the subject of the recipient is correct. If you do everything right, you will get the same result.