
Business Learnings from Shree Bhagavad Gita Karma YogaSpirituality in Business

Business Learnings from Shree Bhagavad Gita Karma YogaSpirituality in Business
In the second chapter of Gita Lord Krishna said,
कर्मण्येवाधिकारस्ते मा फलेषु कदाचन |
मा कर्मफलहेतुर्भूर्मा ते सङ्गोऽस्त्वकर्मणि ||
that means, "You have a right to perform your prescribed duties, but you are not entitled to the fruits of your actions."
And this is where most of the people got confused. If I do not have any expectations then how will I get motivated to do something
For e.g., As a product owner, If I do not expect that my product should grow to whatever level, why would I put my efforts into that.
So Arjuna asks the same question to Lord Krishna, "If I should not keep any expectation about my kingdom then why do you urge me to jump into this war?"
What Karma-Yoga says is, Everyone must engage in some sort of activity in this material world. In short, do actions. You can not run away from your duties or actions. But those actions should be selfless actions that are performed for the benefits of others.
Because in chapter 3, verse 13, Lord Krishna said,
यज्ञशिष्टाशिन: सन्तो मुच्यन्ते सर्वकिल्बिषै: |
भुञ्जते ते त्वघं पापा ये पचन्त्यात्मकारणात् || 13 ||
That means, The spiritually-minded, who eat food that is first offered in sacrifice, are released from all kinds of sin. Others, who cook food for their own enjoyment, verily eat only sin. (source: holy-bhagavad-gita.org)
In our business, every day we should be generous and gracious to the people we work with. Also, we should build a socially responsible business, which means being aware of the company’s impact on workers, consumers, and the environment around it. That means happier employees, who builds better products and ultimately happy customers.
A business can make lots of money, be successful, and grow for years but it should be still giving back to society, providing services, and improving the community around it.
Mitul GolakiyaUse of Required Without Validation Rule in LaravelLaravel
Use of Required Without Validation Rule in LaravelLaravel
Last month, I got consulting for one Laravel project where we have to perform some complex validations.
The scenario was while creating an order, either the customer can select the existing address from the dropdown or he may have an option to create a new address with all address fields.
And when a customer hits enter, the backend needs to validate, if address_id is sent into request then it needs to check if that address id exists and then use that address_id for that particular order. Otherwise, it needs to check if required fields (address1, city, zip, country) for the address are sent, then use them, create a new address and use that new address_id.
so far how validation was happening was manual, so in controller this all manual validation was happening. But I don't find that a proper way. The goal was to do validation from CreateOrderRequest only. so it goes back with proper laravel error messages from a request only and displays them on the page. so we actually do not need to make any manual efforts to make this happen.
That's where required_without validation rule helped us.
The UI was something like this,

In the above UI, customers can either type Address1, Address2, City and Zip or just go and select an existing address from the dropdown.
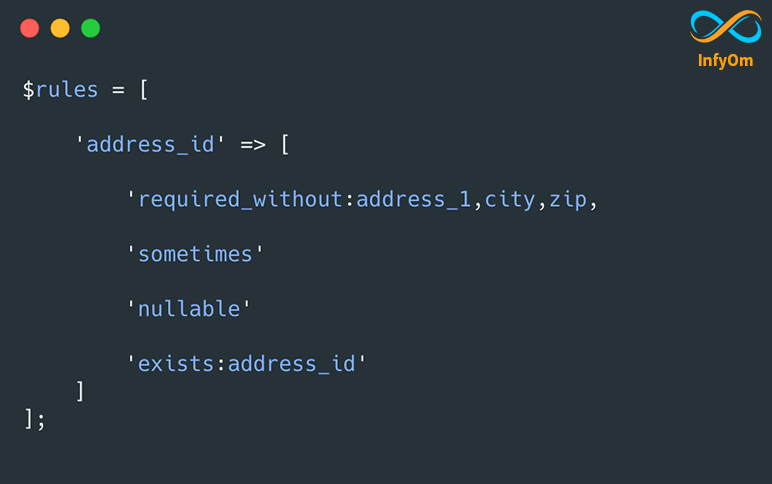
To do this validation from form request, we used the required_without rule as following, 'address_id' => 'required_without:address_1,city,zip|sometimes|nullable|exists:addresses,id',
Now let's try to understand what's happening here. To understand it better let's divide the rules
required_without:address_1,city,zipsometimesnullableexist:addresses,id
1. required_without:address _1,city,zip
This rule validates that address_id field is required without the presence of address_1, city and zip fields
2. sometimes
This means, address_id fields will be passed only sometimes and not required all the time. We need this because when address_1, city and zip fields will be present then we do not need it at all.
3. nullable
This means, address_id fields can be null since it will be null when a customer does not select the address from the dropdown.
4. exist:addresses,id
The passed value in address_id fields, must exist in the addresses table.
So this is how we solved this complex validation in a very easy way by using multiple powerful laravel validation rules.
Hope this can help others as well.
Mitul GolakiyaDateTimeLocal with LaravelCollective Model BindingLaravel

DateTimeLocal with LaravelCollective Model BindingLaravel
Last week, we were working on one project where we were using LaravelCollective for generating our form. LaravelCollective is a really awesome package and reduces lots of efforts, specifically for automatically binding old inputs to our forms.
Problem
With LaravelColletive when we pass null as a second value, it tried to get old inputs if available and inject them. But for some reason, it was not working with datetimelocal.
datetimelocal need a date in Y-m-d\TH:i Format. When I went into the code of FormBuilder.php it’s already managing that and tries to convert date into that format if you have passed DateTime object.
So it was completely working fine while creating a record when you do not have any value.
But I have the same form which was used at both the time of Create and Update. And I was passing null into the value field at both of the time and LaravelCollective injects it automatically from model or old inputs if there is some error. Something like the following,
<div class="form-group col-sm-6">
{!! Form::label('due_date', 'Due Date:') !!}
{!! Form::datetimeLocal('due_date', null, ['class' => 'form-control']) !!}
</div>
So, Due date will be automatically placed from the model. It’s working fine with all other fields except datetimelocal.
Solution
The reason behind that is, the value is retrieved from model due_date field, but it comes in Carbon instance and when it converts to a date string, it’s converted into default format which is Y-m-d h:i:s. So it will not work for datetimelocal input since it requires Y-m-d\TH:i format.
So as a solution, what change we did is, instead of passing null value, we first check, if the model is there then pass the value directly to the input. Something like,
<div class="form-group col-sm-6">
{!! Form::label('due_date', 'Due Date:') !!}
{!! Form::datetimeLocal('due_date', (isset($task)) ? $task->due_date : null, ['class' => 'form-control']) !!}
</div>
So, I will check if I have passed the model $task to the view and then I will pass a due_date value to input. So FormBuilder will convert it to the proper format and it will get displayed into an input.
Now, when we save the form, it will also return the date into Y-m-d\TH:i format, so again we need to convert it to the proper format. For that, we created a mutate attribute for due_date in my Task Model.
public function setDueDateAttribute($value)
{
    $this->attributes['due_date'] = Carbon::parse($value);
}
And that’s it. Our datetimelocal input gets working. I have seen lots of issues on stackoverflow for it. So hope it may help someone.
Mitul GolakiyaSMS Driver with Laravel Facades and Service ProvidersLaravel

SMS Driver with Laravel Facades and Service ProvidersLaravel
In the previous article, we learned How to create Laravel Facade and how it can help to simplify our code and make it more accessible and beautiful.
In this article, we will see how we can control our SMS Provider/Gateway via configuration without even touching the code and changing it from the environment directly.
Use Case
Imagine you have two SMS Providers called ABC and XYZ that you are using in our application. But you need to switch it over time. But the trick is, you do not want to change your code when you change to another SMS service provider. Just like when you change any driver in a Laravel App like Log, Cache, Queue, Database, etc.
So let's figure out how to do that.
Solution
Create SMS Service Contract
Create an SMS Service contract interface that contains the method to send the SMS.
Create a class app/Services/Contracts/SMSServiceContract.php with the following content,
<?php
namespace App\Services\Contracts;

interface SMSServiceContract
{
    public function sendSMS($phone, $message);
}
The purpose of this class is, every SMS Service should implement this interface and it should have at least one method sendSMS with the same parameters.
Create SMS Service Implementations
The second step is to create the real implementation of our SMS Services which will be responsible for sending the SMS.
So as we have two SMS services, we will create two classes,
ABC SMS Service
Create a class app/Services/ABCSMSService.php with the following content,
<?php
namespace App\Services;

class ABCSMSService implements SMSServiceContract
{
    public function sendSMS($phone, $message)
    {
        // Code here to call API of ABC SMS Provider to send SMS
    }
}
XYZ SMS Service
Create a class app/Services/XYZSMSService.php with the following content,
<?php
namespace App\Services;

class XYZSMSService implements SMSServiceContract
{
    public function sendSMS($phone, $message)
    {
        // Code here to call API of XYZ SMS Provider to send SMS
    }
}
Create Facade to Send SMS
The third step is to create a Facade to send an SMS. Create a facade class app/Facades/SMSGateway.php with the following content,
<?php
namespace App\Facades;

use App\Services\Contracts\SMSServiceContract;
use Illuminate\Support\Facades\Facade;

class SMSGateway extends Facade
{
    /**
      Get the registered name of the component.

      @return string
     /
    protected static function getFacadeAccessor()
    {
        return SMSServiceContract::class;
    }
}
Here, note that we are giving SMSServiceContract class name as a facade assessor. So we will need to use that same class name while binding it to the real implementation in our service provider.
Define SMS Driver in config
We need to define our SMS Driver into our config file. You can create a new config file or can use config/services.php. To keep it simple, we will define it in services.php. I will add the following content at the end of the file before the closing bracket. so it will look like something,
<?php
return [undefined]
Define your driver in .env file
Update your .env file and add SMS_SERVICE variable, something like
SMS_SERVICE=abcCreate/Modify Service Provider
The final step here is, we need to either create our own service provider and add it to config/app.php or we can use AppServiceProvider.php as well. To keep it simple let's add it to AppServiceProvider.
In app/Providers/AppServiceProvider.php we will add the following code under the register method,
$this->app->bind(SMSServiceContract::class,
function ($app)
  {
     if (config('services.sms') == 'abc')
     {
          return new ABCSMSService();
     } else {
          return new XYZSMSService();
     }
});
Note: Do not forget to import all these classes at the top.
And that's it.
Usage
Now you can use your Facade to send the SMS.
\App\Facades\SMSGateway::sendSMS($phoneNumber, $message);Or if you made an alias,
\SMSGateway::sendSMS($phoneNumber, $message);Change service provider
Now if you want to change your service provider, all you need to do is, just go to the .env and change the provider to xyz and it will use the XYZSMSService class to send the SMS.
I hope this will help to understand Laravel Service Providers and Facade in a much better way.
Mitul GolakiyaLaravel UPCItemDB PackageLaravel

Laravel UPCItemDB PackageLaravel
We have been working on an inventory system for one of our clients for a long time and recently, what we needed was to retrieve inventory item information by UPC code or ISBN or EAN. so the end customer does not need to fill a full form with all the details.
We implemented a feature where customers can just enter or scan UPC/ISBN/EAN code on the mobile app and we retrieve all the information of the product and auto-fill it with an image of the product as well.
So we started using UPCItemDB which has a very nice database of items. You can call their API and retrieve information about the product by sending UPC code. It has a free plan that you can use for trial purposes.
But there was no proper PHP or Laravel package for that, so we decided to make our own and publish it to Github.
It's called laravel-upcitemdb and here is the link for it: https://github.com/InfyOmLabs/laravel-upcitemdb
Here are the installation steps and how to use this package.
Installation
Install the package by the following command,
composer require infyomlabs/laravel-upcitemdb Publish the config file
Run the following command to publish config file,
php artisan vendor:publish --provider="InfyOm\UPCItemDB\UPCItemDBServiceProvider" Add Facade
Add the Facade to your config/app.php into aliases section,
'UPCItemDB' => \InfyOm\UPCItemDB\UPCItemDB::class, Usage
Lookup
For UPC Lookup, use the lookup method by calling,
\UPCItemDB::lookup('4002293401102'); Search
For Search API, you can use the search method,
\UPCItemDB::search('iphone 6');
\UPCItemDB::search('iphone 6', ['brand' => 'apple']); Things/Tips to Remember while submitting your first Envato CodeCyan AppEnvato

Things/Tips to Remember while submitting your first Envato CodeCyan AppEnvato
Last week we submitted our first app to Envato - CodeCyan called InfyLMS. InfyLMS is a full-fledged library management system to manage libraries built on Laravel+ReactJS.
But it was not just an easy upload. When you upload an item to CodeCyan, they have a dedicated team that tests your application and reviews the code quality of your app.
We have faced a few problems that I want to share, so if someone is uploading his first item to CodeCyan then he/she can review those points before submission and the chances of rejection can be reduced.
1. Do not use remote CDN
We have used Bootstrap in our system as a theme and we were using remote CDN URLs for JS and CSS. for e.g.
// CSS
<link rel="stylesheet" href="https://stackpath.bootstrapcdn.com/bootstrap/4.3.1/css/bootstrap.min.css"
// JS
All your assets need to be offline. so download all these files via either some package manager or just go and download it and put it under the respective asset folder.
2. Use Strict Mode in JS
All Javascript files need to be written into Strict mode.
For example, you can do this with jQuery as follows:
(function($) {
"use strict";
// Author code here
})(jQuery);
Or you can put
use "strict";at the start of your file if they are generated via some webpack. There is a babel plugin available which you can use with a webpack.
3. Attach documentation into the main file
Attach documentation into the main file which you are uploading. Create a docs folder into the root folder and attach full documentation to set up the application. Also, remember that this doc should work offline as well. so attach all your assets here as well.
4. Have Clear & Easy documentation for Non-Technical Users
All the customers or buyers do not have technical knowledge that needs to be there to set up an application. so try to make your application setup as easy as possible. for e.g, create a setup wizard which executes step by step and ask for details from customers.
Or create a dedicated section in your documentation for Non Technical users with clear, precise and minimal steps that needs to be performed.
If possible, then try to give two different zip files under your main zip file, like
- dist - Distribution which can be set up with minimal efforts for non-technical users
- source - Original source file for technical users
I hope this will help new Envato Authors who are uploading their very first item.
Mitul GolakiyaHow to Create Laravel Facade and Simplify CodeLaravel

How to Create Laravel Facade and Simplify CodeLaravel
Last month, I started training in one company where I am giving Laravel Training to around 15-20 PHP Developers, where we discussed the core Laravel concepts to them including Service Providers, Facades, Eloquent, and many more.
There I explained to them the use and beauty of Laravel Facades and how the use of Facade can simplify code. We took a real practical example and use case they have, which I'm outlining here.
Use Case
They are building a CRM application and using some third party API to send an SMS. Though Laravel Notification Channels are the best way to send the SMS but here that's not the goal of this post, so we will try to stick to the Facade development to send the SMS.
Here is how we were sending SMS so far.
Traditional way
Have one common Class/Repository/Manager called SMSManager.
<?php
namespace App\Managers;

class SMSManager
{
    public function sendSMS($recipient, $message)
    {
        // code to send sms
    }
}
This code and pattern look completely fine. But the problem was every time when we needed to send an SMS they needed to either Create/Inject SMSManager class and call sendSMS method of it.
Parsedown | the parser that we created ... $smsManager = new SMSManager(); $smsManager->sendSMS($phoneNumber, $message); ... Parsed in 0.13 ms or 1 times faster
...
$smsManager = new SMSManager();
$smsManager->sendSMS($phoneNumber, $message);
...
Also, this code is not scalable. If you want to change your SMS Provider then you need to replace the function or create a new function. Or you want to use multiple SMS Providers for different users based on their subscription then this way doesn't work.
Laravel Facade Way
Laravel Facades is a great way to call static interfaces of the classes. So you don't need to make/inject SMSManager class instance and you can directly call sendSMS function.
To do that, we need to create Facade class and bind its accessor in Service Provider. We can create our own service provider or even can do it in AppServiceProvider as well. To keep it simple, let's use AppServiceProvider as of now.
Create a Facade Class
Create a new class called SMSGateway into app\Facades directory with the following code,
<?php
namespace App\Facades;

use Illuminate\Support\Facades\Facade;

class SMSGateway extends Facade
{
    /**
      Get the registered name of the component.

      @return string
     /
    protected static function getFacadeAccessor()
    {
        return 'sms_gateway';
    }
}
Bind Facade with SMSManager Implementation
The next step is to bind our facade class with our real SMSManager implementation. To do that, open AppServiceProvider and add the following line to the register method,
$this->app->bind('sms_gateway', function ($app) {
    return new SMSManager();
});
Now, we are all set to use our Facade in our code.
Usage of Facade in code
To send an SMS, we now no longer need to create instance of SMSManager, we can directly use,
\App\Facades\SMSGateway::sendSMS($phoneNumber, $message);Make Alias (Optional)
Or, you can add this facade to config/app.php into aliases section,
'SMSGateway' => App\Facades\SMSGateway::class,And you can directly call,
\SMSGateway::sendSMS($phoneNumber, $message);So this way, we can clean out our code and utilize the Laravel Facade to make our code more beautiful.
Hope this helps.
Mitul GolakiyaLaravel App - Code Optimizations TipsLaravel

Laravel App - Code Optimizations TipsLaravel
Last month we started working on one of our internal project called InfyTracker, which we were planning to use as a simple time tracker and very little of project management or task reporting.
We have also published it as an open source project to our Github account so other people from the community can use it. It's still in alpha stage and we are still working on it and making tons of improvements. But, While building this project, we found a few things that we think might be useful to optimize the app or can be used in other projects. Also, I think lots of developers even do not realize these things.
So I planned to share it with the community where I will be discussing them in a detail with solutions we used. So here are the things/mistakes that we found during our project development.
- Adding all stylesheets and scripts in a layout file
- Not separating out page level CSS or JS
- Not using laravel-mix
1. Adding all stylesheets and scripts in layout
What I've seen is, when we want to add a new library/package to the project, people generally go to the layout file and just insert a style and script tag there.
For e.g., I want to use moment-js in the app, so what I do, I go to my layout file and include moment-js script tag there via CDN. Even if I only need moment-js in few of my pages. same can be there for other libraries like datatables, even if we only need datatables in a few pages of the app.
The problem it creates is, even if we don't need them in most of our pages, those files are still included in our page and of course, the page takes more time to load.
2. Not separating out page level CSS or JS
Generally, we use lots of JS in our code. And for all page level JS/CSS, most of the developers put it in a blade file of the page at the bottom with some section of JS/CSS.
For e.g, I have used a datatable in my page, so I need to initialize the datatable. so generally, I will have declared one section called scripts or bottom_js which will be yielded in my layout file. That's what I have seen in lots of code.
But, there are two problems with that,
- When that page is loaded, your JS code is completely visible to the world and sometimes that's not good and secure
- It's not minified (and since it's sitting into your blade files, there is no way to minify it either)
3. Not using laravel-mix
In really few projects or very few expert developers use laravel-mix or use laravel-mix in the right way. When you do not use laravel-mix in your site, your JS/CSS files are not minified. It's completely visible to the world which can be sometimes dangerous and file sizes are big as well in large projects.
That's the three major things that we found while developing this project.
Here is the solution that we used to overcome these problems.
Solution 1. Adding all stylesheets and scripts in specific pages
To resolve this problem, we declared two sections in our layout file.
- stylesheets
- scripts
so all of our web pages which has a dependency for the third-party CSS/JS libraries will look like following,
@extends('layouts.app')
@section('stylesheets')
<link rel="stylesheet" href="https://rawgit.com/fronteed/iCheck/1.x/skins/all.css">
@endsection

@section('content')
....content here....
@endsection

@section('scripts')
<script src="https://cdnjs.cloudflare.com/ajax/libs/iCheck/1.0.2/icheck.min.js"></script>
@endsection
As per the above example, the iCheck library will be only added on pages where we are actually using iCheck instead of all of my web pages.
Solution 2. Separating out page level CSS or JS
To resolve this problem, we also declared two new sections in the layout file.
- page_css
- page_js
page_css section will contain page level CSS and page_js section will contain page level javascript like initializing datatable or checkboxes etc. Also, all page level CSS and JS are not placed directly inside the blade file. But we go one step further.
Under the resources/assets folder, we have two folders,
- js - contains all page level JS for different blade files
- styles - contains all page level CSS for different blade files
We tried to follow the same folder structure for this that we used for our blade views.
If you have multiple files then you can try to use names like index.js, edit.js, etc, just the same as your blade view names.
And in your blade view files, you can include them as a script or stylesheet. For e.g.
@section('page_js')
<script src="{{ mix('assets/js/task/task.js') }}"></script>
@endsection
Note: Use of mix is explained in the next section. so you can just ignore that as of now. But the basic idea is, include them as a script or stylesheet with sections, instead of directly putting them in blade files.
Solution 3. Using laravel-mix
Laravel mix is a great tool for asset compilation. All of the page level JS/CSS files and other common JS/CSS should be compiled by laravel mix and should be copied to the public folder with versioning for cache busting. And then it will be included via mix helper in our blade views. (As explained in the above solution at the bottom of the section).
For e.g. our webpack.mix.js looks like the following,
/* CSS */
mix.sass('resources/assets/style/sass/laravel/app.scss', 'public/assets/style/css/app.css')
.sass('resources/assets/style/sass/style.scss','public/assets/style/css/style.css')
.sass('resources/assets/style/sass/dashboard.scss','public/assets/style/css/dashboard.css')
.version();

/* JS */
mix.js('resources/assets/js/custom.js','public/assets/js/custom.js')
.js('resources/assets/js/users/user.js','public/assets/js/users/user.js')
.js('resources/assets/js/task/task.js','public/assets/js/task/task.js')
.version();
This will minify our code and make it secure in the production environment.
Hope this helps.
Mitul Golakiya


