Tips Posts
How To Increase Sales Through Digital MarketingSales
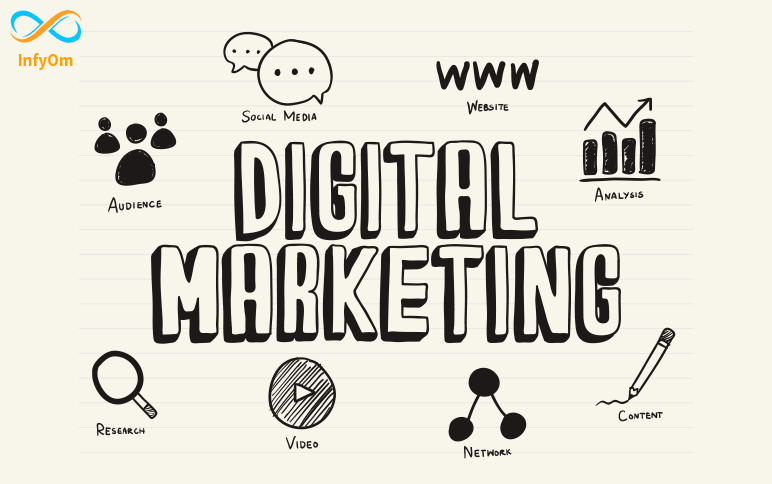
How To Increase Sales Through Digital MarketingSales
Introduction
Digital marketing can increase sales if we choose the best strategies.
Being an influential and well-known brand in your audience is something that is essential and positive.
Be available to your customers
75% of consumers expect to find a solution to their problem within five minutes of facing it. If you do not provide a solution, there is a good chance that they will not return to your business.
The online world is 24/7, so when you're not actively available to your customers, it's important that you set up a live chat, even if it's a bot.
Excessive communication with your customers
Transparency is key in the digital world. Trust is especially important where face-to-face communication is limited.
Building trust and then delivering on your promises is the key to enhancing the customer experience and ensuring that your brand's reputation is as strong as it can be to ultimately boost sales.
Offers and Discounts
We place some offers or discounts for our business during the festive season etc.
Clicking on Digital Marketing Pay will display advertisements of your business on various social media sites through advertising techniques. This ad will reach all the social media users so your sales will increase.
Use social networks
Social networks are very helpful in maintaining the reputation of your brand.
People like to have a unique experience with your brand on different social media channels. You need to choose the right channels for your business.
Create videos for YouTube
YouTube is an online video platform with millions of users and viewers every day. You should use these leading platforms as they can help your business grow through video views alone.
Videos can be made by you, your team, or (for more professional videos), videographer or photographer. Make sure your content is relevant to your audience or create videos specifically related to your business.

How to Connect Gatsby to WordPressGatsby

How to Connect Gatsby to WordPressGatsby
Gatsby is a blazing-fast website framework for React. It allows developers to build React-based websites within minutes.
WordPress
WordPress is a free and open-source content management system written in PHP and paired with a MySQL or MariaDB database. Features include a plugin architecture and a template system, referred to within WordPress as Themes.
Integrate Gatsby with WordPress
Install gatsby-source-wordpress package
npm install gatsby-source-wordpress
gatsby-config.js file
add the gatsby config file in the following code
 plugins: [
    ...
    {
        resolve: `gatsby-source-wordpress`,
        options: {
            // Specify the URL of the WordPress source
            baseUrl: `localhost:8888/wordpress`,
            protocol: `http`,
            // Indicates if a site is hosted on WordPress.com
            hostingWPCOM: false,
            // Specify which URL structures to fetch
            includedRoutes: [
              '**/posts',
              '**/tags',
              '**/categories'
            ]
        }
    }
Now connect your gatsby website and Wordpress.
Here is an example of the GraphQL API query
import React from "react"
import { graphql } from "gatsby"
import Layout from "../components/layout"
import SEO from "../components/seo"

export default ({ data }) => {
  return (
      {data.allWordpressPost.edges.map(({ node }) => (
        <div>
          <p>{node.title}</p>
        </div>
      ))}
  )
}
export const pageQuery = graphql`
  query {
    allWordpressPost(sort: { fields: [date] }) {
      edges {
        node {
          title
          excerpt
        }
      }
    }
  }
Hope this helps.

How to convert a Lead into a ClientSales

How to convert a Lead into a ClientSales
Most of your leads through your conversion funnel will not automatically convert into sales. He will often need extra help to make the conversion.
Talk about value first
Focus on bringing value to your customers' lives. People dislike it who only care about getting sales from it. focus on addressing your customers' needs.
Work as a mentor with great expertise in your field. If you are the center of contact for potential customers, they will also trust your decision and solutions to their problems.
Identify their problem
You need to identify the problem that is causing the lead. Whenever you ask a question, take a different approach, because it starts a conversation. This is a great way to open up a conversation and raise questions or concerns that might arise.
Make it a conversation
It is clear that your potential will be more responsive if you encourage two-way communication. You can definitely find out how your product or service works for them.
Ask for sales
Just asking for a sale is nothing new or innovative, but it is a crucial part of the conversion process. That sounds like common sense, yet a surprising number of people don't.
Ask your prospects if they are ready to get started and see how many say "yes". They would not have gone so far had it not been for their initial interest in becoming a customer. If you do not ask for sales, you will have competition.
Follow-up
Keep your leads in purchase mode by following up via email or phone calls. This is a great way to quickly convert them into customers before a long time passes. All leads you generate should be contacted immediately and followed up in a few days.
You want to make sure they are as successful as possible with the product and that all their questions are answered.
The Difference Between UX and UI DesignDesign

The Difference Between UX and UI DesignDesign
UX and UI designs are similar and are often used interchangeably. In fact, these two words have completely different meanings and relay different activities. These two businesses have essentially been around for years, but only recently have been involved in the technology industry, which has been renamed to encourage UI and UX designers.
These two components are essential when it comes to digital products, but the roles are very different. They refer to various aspects of both product development as well as the actual design process. Although UX means "user experience" and UI means "user interface", both jobs cover much more than they seem, which makes learning UX and UI more important at the same time.
User Experience Design (UX)
Originally defined by a cognitive scientist named Don Norman, the term "user experience" was defined before the 21st century. He described UX as "all aspects of the end-user interaction with the company, its services, and its products".
UX can be applied to anything in life that creates an experience. Whether it's a website, a mobile app, a theme park, or a tea party. UX doesn't have to be related to anything in the world of graphic design. User experience is the user's interactions and user "experience" with a product or service.
When it comes to digital products or services, UX is concerned with how a web page, mobile application, or software perceives the user. This may include simplifying the website checkout process or simplifying the application for general use.

You could say that a UX design job requires marketing, design, and project management skills. It is a complex role. Regardless of whether it is being applied to a car, shoe, or website, UX Designer's main goal is to create a simple and pleasant user experience. The product needs to communicate the owner’s goals, while also meeting the needs of the user.
User Interface Design (UI)
UX and user interface (UI) are often compared or grouped in the same job description. These two modes are very different, leaving the UI to be misinterpreted.
Often when looking at job descriptions for UI offerings, you will see a closer description of graphic design. Although UI positions sometimes deal with parts of branding or even frontend development, they do not indicate the original position.
User interface design is a digital term. This is mainly where it differs from UX. A UI is simply an interaction between a user and a digital product or service. This may include a touchpad that allows you to select your coffee from an automatic coffee machine or from your computer screen. It also deals with applications and websites that look and feel how the user interacts with the product.

The main purpose of the UI is that the designer will use design tools that enable better communication between the designer and the developer. This in turn will facilitate implementation with developers.
The user interface is an incredibly important element that allows the user to trust the brand. The UI designer is also responsible for relaying the message of the product as well as its research and content into a compelling display or experience.
UX vs. UI
The comparison of UX and UI is almost like apple and orange. If you take the human brain with the right hand representing creativity (usually left-handed individuals), this would be the UI design. If the left side of the brain represents the analysis (usually right-handed individuals), then the left side UX.

UI design is creative, fuzzy, beautiful, and presentable. UX design is, alternatively, the optimization, organization, and structure of the data to be implemented. Without one or the other, the project cannot be completed. To complete the product, you may not lack UX or UI. Despite this, they have completely different roles with different functions.
In general, a UX designer will need to fully map the entire user's journey to solve a specific problem in a product. Much of the UX Designer's job is to understand the user's problems and how to solve them. UX designers work by researching to understand the users they are targeting and what their needs will be.
Alternatively, UI designers consider all aspects of the visual elements. Everything from the first screen to the last screen. The UI designer will make sure the colors are readable. This may include ensuring that a partially blind 65-year-old feels comfortable using the same screen as a normal 13-year-old.

How to check Laravel logs with UI Interface ?Laravel
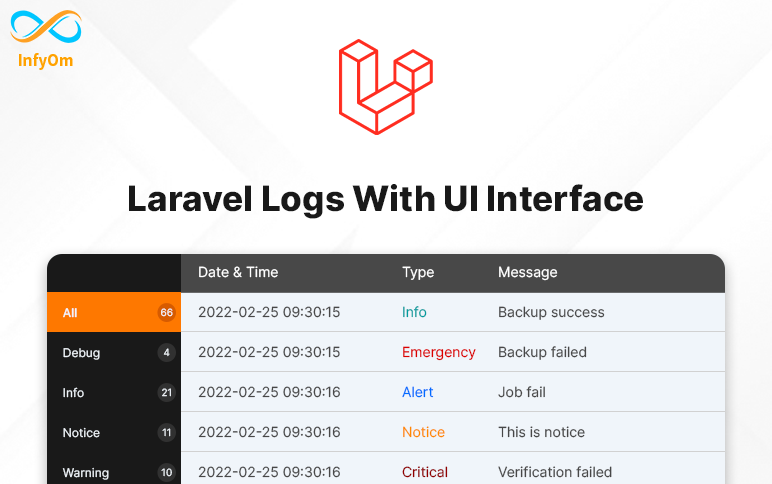
How to check Laravel logs with UI Interface ?Laravel
Debugging the most important thing that developers always need while developing things.
If it's about local environments then we can easily check our logs by putting logs to local but when it's about live environments it's a time-consuming process.
We have to go to the files and open/download those files to local and then we are able to check live logs.
Here we are going to one package that will provide us the UI interface and we can easily check all our logs there.
We can also clear / delete our logs files from there. its better to use daily logs so we can trace logs easily.
Let's see how we can integrate that package to our existing laravel application.
Installation
composer require rap2hpoutre/laravel-log-viewer
Add Service Provider to config/app.php in providers section
Rap2hpoutre\LaravelLogViewer\LaravelLogViewerServiceProvider::class,
Access Logs UI By adding a new route
Route::get('logs', [\Rap2hpoutre\LaravelLogViewer\LogViewerController::class, 'index']);
That's it and you can see all the logs thereby accessing the given route.
That will saves lots of debugging time, hope that will help you :)

An In-Depth Look at the Adobe Premiere Pro Editing ToolsDesign

An In-Depth Look at the Adobe Premiere Pro Editing ToolsDesign
Let’s Explain Every Tool From The Toolbar In Adobe Premiere Pro
As a beginner video editor you often struggle with finding the right tools to perform certain actions while editing. And once you’ve finally found some tools to edit, you don’t know what they do. We’ve all been there, so here’s a quick and easy explanation of every tool in the toolbar.
Selection Tool (V)

The Selection tool allows you to perform basic selections and edits. This will be your default and primary mouse function when using Premiere Pro, so make sure to remember the short key for it, which is V on your keyboard. Along with making basic selections, you can also select edit points and perform trims where you can increase or decrease a clip’s duration.
Track Selection Tool - Forward (A) / Backward (Shift+A)

The Track Select tool will let you select all of the clips in a sequence, either forward or backwards. All you need to do is use the keyboard shortcut (A) and you can highlight multiple clips at once, in whichever direction you prefer. If you hold shift, the tool will select only one track instead of all of the tracks.
Ripple Edit Tool (B)

One of my favorite shortcut tools in Premier Pro, Ripple Edit is a trim tool used to trim a clip and "wave" the rest of the clips in a timeline. This will effectively close the gap between the two editing points immediately at the point where you will be editing. This can save a lot of time when editing on-the-fly, as you don't have to manually navigate the rest of your timeline — especially if you're dealing with videos or sequences longer than a few minutes.
Rate Stretch Tool (R)

The Rate Stretch tool will help you speed up or slow down the clips in your order. When using the tool, note that the in and out points of the clip will always be the same. You will change the duration and speed of the clip according to the amount you "stretch" through the trim. For example, extending the outpoint of a clip will slow down the speed, while shortening the clip will speed up the duration.
Slip Tool (Y)

For visual editors who prefer to make their cuts based on specific images of the corresponding frames, Slip Tool is a great resource for working directly from the monitor. The slip tool "slips" the source of the clip in and out, but does not move it on the timeline.
Slide Tool (U)

Like the Slip Tool, the Slide Tool allows you to work with your clips drawn on the monitor. However, the slide tool works by "sliding" the clip on the timeline, while keeping the source in and out points the same. After sliding the clip, the tool will also close all the gaps.
Pen Tool (P)

Moving on to editing shortcuts and tools to help with keyframes and other elements (such as audio), the Pen Tool is your best choice for adding keyframes to any clip. By selecting the Pen Tool (P), you can click on any point on your clip to add a large number of features, including the opacity, scale, position, and even volume of the audio clip.
Why developer choose React JSReact

Why developer choose React JSReact
There are a few reasons why developers choose ReactJS and they are :-
- JavaScript XML or JSX
- React use Virtual DOM
- ReactJs Props
- One-Way Data Binding
- Quick Rendering
- SEO Friendly
- Helpful Developer Toolset
JavaScript XML or JSX
It is a markup syntax that describes the appearance of the application's interface. It creates the same syntax as HTML and is used by developers to create feedback elements.
JSX is one of the best features of React JS as it makes it very easy for developers to write building blocks.
React use Virtual DOM
This feature helps speed up the app development process. The algorithm allows the web page to be copied into React's virtual memory.
The original DOM there is represented by a virtual DOM.
ReactJs Props
ReactJS Props allows developers to move custom development data into its specific UI components. This helps in rendering JavaScript components and improving the UI development experience.
One-Way Data Binding
Feedback uses a stream of data that is directionless, forcing developers to use the callback feature to edit components and prevent them from editing directly.
Control of data flow from a single point is achieved with a JS app architecture component called Flux. It really gives developers better control over the application and makes it more flexible and effective.
Quick Rendering
This means that a small edit made at the top level can hit the app UI hard. Thanks to the virtual DOM, it can be tested first to determine the risk level with each change before finalizing all changes.
SEO Friendly
To make any application work well, it is important that the search engine selects it; Two factors are important for applications: fast load time and rendering. If both of these boxes are ticked, your app will rank higher on Google results pages.
React's super-fast rendering feature drastically reduces page load time, enabling businesses to rank their apps on the first page of Google search.
Helpful Developer Toolset
Facebook has included many developer tools in the React JS framework for React and Chrome, and they greatly help developers find parents and child components, observe their hierarchies, and test their current status.
Through self-learning, developers will be able to use emerging technologies in real, live, projects.
So, developers choose ReactJS hope this help.
How To Setup SSH key in WindowsLaravel

How To Setup SSH key in WindowsLaravel
In this article, I show you how to set up SSH in windows10,
first of all, you have a question what is the ssh key, and why do we need it?
you can watch this video or follow an article.
Let me explain a bit more, An SSH key is a secure access credential used in the Secure Shell protocol. SSH keys use key pairs based on public key infrastructure technology, the gold standard for digital identity authentication and encryption, to provide a secure and scalable method of authentication. as you know all developers use git for pushing, fetching, and pulling their code from GitLab, GitHub, and any other tools.
So, using SSH key you can use git for your repository and get authentication from GitHub or any tool where you add ssh.
When you set up an SSH key, you create a key pair that contains a private key (saved to your local computer) and a public key.
So, Let's Set up SSH for Git on Windows
Step1: Set up your default identity
firs of all open your terminals like gitbash or cmDer.
- Now, type the command
ssh-keygenand enter and command prompts you for a file to save the key in:
$ssh-keygen Generating public/private rsa key pair. Enter file in which to save the key (/c/Users/emmap1/.ssh/id_rsa):
-
Press enter to accept the default key and path,
/c/Users/<username>/.ssh/id_rsa. or you can specify the path and then press enter. -
Enter and re-enter a passphrase when prompted.
-
final out put in your terminal is look likes,
ssh-keygen Generating public/private rsa key pair. Enter file in which to save the key (/c/Users/shailesh/.ssh/id_rsa): Created directory '/c/Users/shailesh/.ssh'. Enter passphrase (empty for no passphrase): Enter the same passphrase again: Your identification has been saved in /c/Users/shailesh/.ssh/id_rsa. Your public key has been saved in /c/Users/shailesh/.ssh/id_rsa.pub. The key fingerprint is: e7:94:d1:a3:02:ee:38:6e:a4:5e:26:a3:a9:f4:95:d4 shailesh@InfyOm-PC -
Let's navigate to path
cd /c/Users/shailesh/.ssh/and firelscommand for confirming file generated or not. -
lscommand displays two files, one for the public key (for example id_rsa.pub) and one for the private key (for example, id_rsa) if successfully generated.
Step 2: Add SSH in Bitbucket.
- let's fire command
cat id_rsa.pubon the terminal and make sure you stay on the.sshdirectory. - Now, you can see the key in the terminal. so, copy it and add it to bitbucket. click here for Github to add SSH to your account.
Step 3: Add the SSH key to the ssh-agent.
fire command $eval ssh-agent into the terminal and you get output like Agent pid 9795. 9765 PID may be different in your PC.
Step 4: Check Login in terminal
fire command ssh -T git@bitbucket.org in your terminal and you can get output like
Warning: Permanently added the RSA host key for IP address '104.192.141.1' to the list of known hosts.
authenticated via ssh key.

You can use git to connect to Bitbucket. Shell access is disabled


